2008 October 21 / jjddaavviiss@@ccaarrlleettoonn..eedduu
Carleton College CS 201, Prof. Joshua R. Davis
As you probably know, many of the images that you see daily are produced by computer software. For example, photographs are processed digitally by programs such as Adobe's Photoshop or the GNU Project's GIMP. With these programs the user can increase or decrease contrast, hide blemishes on a supermodel's face, or paste alligators where they shouldn't be.
The user can also perform color correction — meaning, adjust the amounts of various colors in the image, to correct for bad photographic conditions, make one part of the image "pop out", etc. For the purpose of color correction, it is helpful (for both the user and the program itself) to generate a histogram that shows the spread of colors used in the image.
To understand this, we need a little background on how colors are represented in a computer. There are many schemes, but the one we'll use is called RGB. Here, each pixel in the image consists of some amount of red, some amount of green, and some amount of blue. Commonly each amount is stored as an 8-bit integer, so that it can take on any integer value between 0 and 255. 0 denotes none of the color; 255 denotes all of the color. Here are some examples of RGB values for common colors:
In this assignment, you will write a program that takes in an image file and draws histograms representing the distribution of its red values, its green values, and its blue values. For example, here is a picture of a well-known Northfield-area miscreant.

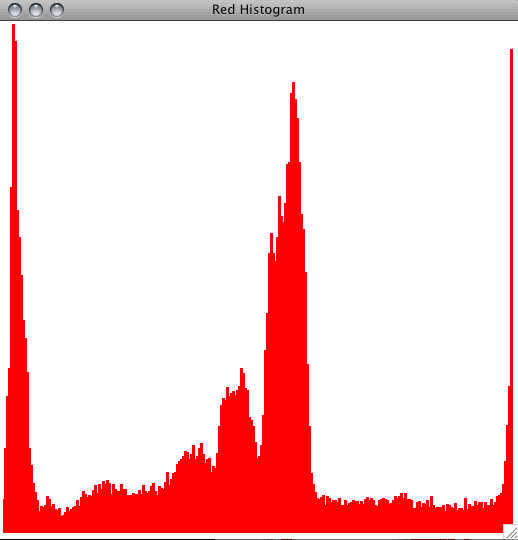
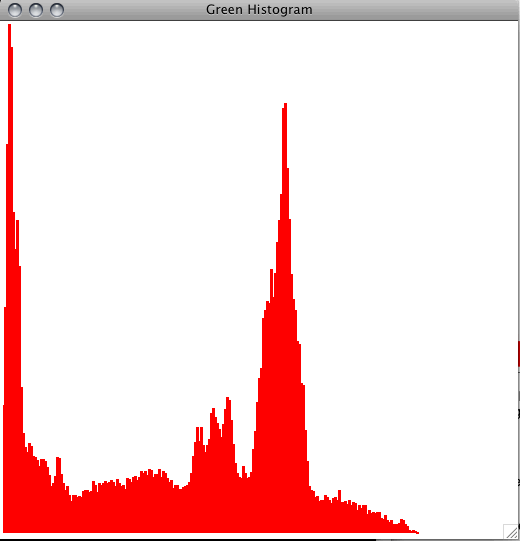
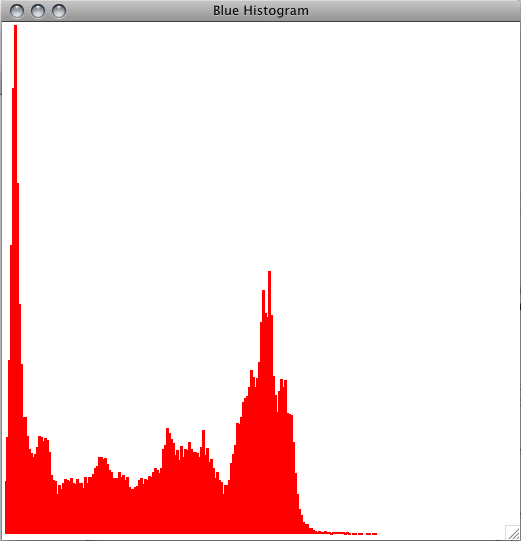
Shown below are the histograms for this image. The first one shows how many pixels there are with R = 0, R = 1, R = 2, ..., R = 255. The next histogram does the same for green, and the final one does the same for blue.


Notice that all three histograms have a spike around 0; this is because there are many black pixels in the image, which have RGB values close to (0, 0, 0). Meanwhile, the red histogram has a lot of entries near 255, while the others do not; this red spike is caused by the miscreant's pinkish skin color (not the red shirt). Try to guess what the spikes in the middle of the histograms represent.
Here are the files we'll need.
CountingTree
CountingTree is a simple datastructure we'll use to count how many pixels we find of each kind. Like a binary search tree node, a CountingTree node stores both a key and a value. The value is assumed to be an integer; intuitively, it counts how many times the key has been added to the tree. Here are the main methods.
increment(key) increments the value associated to the given key. If the key is not in the tree yet, then it must be added to the tree, with a value of 1.
getMaxValue() returns the largest value stored in the tree.
plot(window, maximum) draws the tree's keys and values in a histogram. The window argument is the window into which you draw. The maximum argument is the height of the tallest bar in the histogram; the tallest bar is drawn to the height of the window, and all other bars are drawn proportionally (so that the histogram fits in the window). Much of this code is provided for you, but you will need to add code to recursively plot the tree's subtrees. The recursion should be written so that the pixel values are drawn in order. For example, if your image contains pixels with red-levels of 0, 214, 18, and 3, then the 0-bar should be drawn first, followed by the 3-bar, then the 18-bar, then the 214-bar. What kind of tree traversal accomplishes this?
CountingTree as a subclass of BinaryTree. You may need to write more methods than just the three given above. As always, you should make proper use of BinaryTree as a superclass. In particular, you should not access the instance variables of BinaryTree directly; you should access them only through BinaryTree's methods. For example, if you want the node's root value, then do not write self.value; write self.getRootValue(). This is an important aspect of data encapsulation. Python does not enforce it, but you should enforce it for yourself anyway.
CountingTree
As a data structure, CountingTree is a little inconvenient to use, because it doesn't handle the case when there are 0 values stored in the tree. The same problem was true of BinarySearchTree, as implemented in class. To solve it, we wrapped BinarySearchTree in a Dictionary class that managed the tree for us and gave us a nice ADT. (Our book does the essentially same thing, except that it uses the name BinarySearchTree where we use Dictionary, and it uses TreeNode where we use BinarySearchTree.)
In the file colorhistograms.py, create a wrapper class for CountingTree. The rest of your program will be using this wrapper class (and not the CountingTree class), so design it to have a easy-to-use interface (i.e. methods). You may want to write a preliminary version, and then adjust it as you work on the rest of the program. Once your class is in its final state, thoroughly document/comment each method, so that anyone reading your class knows exactly how it behaves. In other words, you're designing your own ADT here, so make it useful and understandable.
Since your wrapper class encapsulates all of the functionality of CountingTree, it must respond to some kind of plot() method. This method must create the histogram window, and then tell the CountingTree to draw into this window. Here is my code for creating the window:
window = GraphWin(colorName + ' Histogram', 512, 512)By making
colorName equal 'Red', 'Green', or 'Blue' I can customize the title of the window (as seen in the screenshots above). The 512s you see are the width and height of the window, in pixels. If you change those, then you'll also have to change the arithmetic in CountingTree's plot() method.
In this course, our early assignments provided step-by-step instructions for assembling the various parts of the program. Now that we have some more experience, you are expected to carry out more of this high-level planning yourself. For example, in the preceding section you were asked to design your own ADT. In this section, you are asked to figure out the rest of the program without specific instructions. Use the code skeleton in colorhistograms.py as a guide. Of course, feel free to ask questions.
You'll need to know a little about how to use images stored in a FileImage. The width and height of the image (in pixels) can be obtained by calling image.getWidth() and image.getHeight(). The RGB values of the pixel in the ith column and jth row can be obtained by calling
[r, g, b] = image.getPixel2D(i, j)
By Monday at 11:59 PM, submit your files binarytree.py and colorhistograms.py electronically, either using hsp or by putting them on COURSES manually. Your work will be graded based on these criteria:
CountingTree is correct and uses its superclass well (3 points) and clear/well-commented (1 point).