2010 February 6 / j d a v i s @ c a r l e t o n . e d u
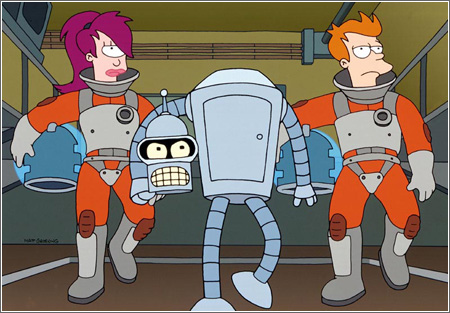
The purpose of this assignment is to practice with loops, functions, and image processing. Specifically, you will write an inker, which is a piece of software that takes in an image and colors all of the edges in the image black, so that the image looks like it was drawn in ink. For example, the now-defunct television show Futurama used this kind of technique heavily. The show employed a mixture of hand-drawn cartoonery and computer-generated images. The computer-generated images were inked, so that they matched the hand-drawn images in style. You can see this somewhat in the following still image; the figures are hand-drawn, but the background is computer-generated.
To see the effect more dramatically, watch the Futurama opening credits. This 30-second video clip shows cartoon images of a city that are much too complicated and precise to be drawn by hand; they were generated and inked entirely by computer. (Disclaimer: I don't have any inside knowledge of Futurama, so some of what I'm saying here is just guesswork. Furthermore, there are multiple inking techniques, and Futurama may not have employed the same one we implement here. But you get the idea.)
As usual, you are encouraged but not required to work with a partner. The assignment is due Saturday at 11:59 PM.
Download these files to your computer. You will not edit any of these files; you will write all of your code in another file, called inker.py. I offer a couple of image files, on which you can test your software; you are encouraged to obtain other test images from the web.
cImage.py is the image library that our textbook uses.
imageprocessing.py is our basic image-processing code from class.
paris.gif is an illustration.
jdavis.jpg is a photograph.
This assignment's material is described on pages 225-231 of our textbook. You might want to read those pages before proceeding. We have discussed some of it in class already.
The file imageprocessing.py contains a function filteredGrayscaleImage() that takes in a grayscale image and a 3x3 kernel, and returns a new image. It constructs the new image by filtering the original image with the kernel. Filtering an image with a kernel means taking a weighted average of pixels, with the weights determined by the kernel. Because the pixels are grayscale, their channels (red, green, and blue) are all equal; we can use any one we want, so we just use the red channel. By passing various kernels to filteredGrayscaleImage(), we can process any grayscale image in various ways — blur, sharpen, etc. Several kernels can already be found in imageprocessing.py. Using these, and others of your own invention, play around with filteredGrayscaleImage() until you're sure you understand it, before proceeding.
In this section we write an edge detector grayEdgeImage() for grayscale images. There is already a edge-detection function edgeDetect() on page 230 of the textbook, but I ask that you write another version. Why? First, the textbook's version takes in an RGB image and converts it to grayscale; I don't like that. Second, I want you to understand the relationship between grayEdgeImage() and filteredGrayscaleImage(). Third, I insist on using notation different from the book's, and I want you to understand the algorithm well enough that you can express it in this different notation and then compare the result to the book's version.
Edge detection is similar to the image filtering performed by filteredGrayscaleImage(). However, edge detection uses two kernels — one that detects vertical lines and one that detects horizontal lines — and a threshold instead of a weighted average. Specifically, the kernels are
For each interior pixel in the original image, we take a weighted sum of surrounding pixels usingxKernel = [[-1, -2, -1], [0, 0, 0], [1, 2, 1]] yKernel = [[1, 0, -1], [2, 0, -2], [1, 0, -1]]
xKernel to get a number, which we call xVar. Roughly speaking, xVar measures how dramatically the image varies in the x-direction; in other words, it is large if there is a vertical edge running through the pixel. Similarly, we take a weighted sum using yKernel to get a number yVar that measures variation in the y-direction and is large if there is a horizontal edge running through the pixel.
So the pixel is on an edge if xVar is large and/or yVar is large. How large is large? This is determined by a threshold. If
xVar**2 + yVar**2 > threshold**2
then the pixel is an edge; otherwise it is not. The textbook recommends 175 for a threshold; in my tests this seems pretty good, but no threshold works for all images, so we want to be able to try various values.
Question: This edge criterion is implicit in the code on page 230 of the textbook. Where? Does the book's version produce the same results as mine? Is one version better than the other?
Now, in inker.py, write a function grayEdgeImage() that takes in a grayscale image and a threshold value, and returns a new image. In the new image, interior pixels are colored black or white according to whether they are edge pixels or not. To write this function, copy and paste filteredGrayscaleImage() from imageprocessing.py to inker.py, rename it grayEdgeImage(), and edit it there. The function must use the kernels I gave above, and it should end up with the same basic structure as filteredGrayscaleImage().
You can make grayscale versions of paris.gif, jdavis.jpg, etc. using processedImage(). Test your grayEdgeImage() function on them, using various thresholds. Here's paris.gif and its edge image for a threshold of 175:
The edge image is not perfect. Some edges appear as thick lines, while others appear as thin lines. Some edges — such as between the darker skin, the blue shirt, and the red shirt — are missed entirely. Why are these edges missed? (We'll discuss and fix this later.)
In this section we write a rudimentary inker using the edge detector from the preceding section. The basic idea is quite simple: If we could just overlay the edge image onto the original image, then we'd have an image with the edges colored black. So let's write a function to overlay images. But as long as we're writing a new function, let's try to make it useful in a wide variety of situations; let's write a general "image combiner".
Recall that processedImage() takes in an image and a color function. The color function takes in an RGB color and outputs an RGB color. processedImage() returns a new image, created by applying the color function to each pixel in the old image.
Now, in inker.py, write the function combinedImage() that takes in two images and a color function. This time, the color function takes in two RGB colors and outputs an RGB color. combinedImage() returns a new image, created by applying the color function to corresponding pixels in the two given images.
Here is an example of a color function. For each channel (red, green, blue), it multiplies the percentage in one image by the percentage in the other image to get the percentage in the new image.
def productRGB(rgb0, rgb1):
    return (rgb0[0] * rgb1[0] / 255, rgb0[1] * rgb1[1] / 255, rgb0[2] * rgb1[2] / 255)
Once you've written combinedImage(), write a function grayInkedImage() that takes in an image and a threshold, uses processedImage() and grayEdgeImage() to get an edge image, uses combinedImage() and productRGB() to combine the original image with the edge image, and returns the result. Here's mine:

The inker grayInkedImage() from the preceding section doesn't work perfectly, because the grayscale edge detector doesn't work perfectly. For example, it misses many edges in paris.gif. Have you figured out why? It's because the edge detector works only with grayscale information, and the edges are not very apparent in grayscale:

Here is your final task. In inker.py, write a function inkedImage() that takes in an image and a threshold, detects edges using all three channels of color in the image, and returns an inked image. This description is intentionally vague; I want you to figure out the details. My result for paris.gif is shown below.
Comment your code for inkedImage() thoroughly, so that the grader can understand your algorithm just from reading the comments. Test your inker on various images, including both illustrations and photographs. You should get widely varying results. Real images tend to have complicated color content, which foils our basic edge detection techniques.
This reminds me of our Frequency Analysis lab, in which we had a good idea for cracking the substitution cipher, that didn't work well because the letter frequencies in our messages didn't perfectly match our expected frequencies. Real data — whether they come from images, text, stock markets, or scientific experiments — are messy. The discipline of statistics exists specifically to deal with the messiness of data, and algorithms for serious data manipulation make extensive use of statistical techniques. Those algorithms are beyond the scope of an introductory course in computer science.
Submit your work electronically by Saturday 11:59 PM. It will be graded according to these criteria.
grayEdgeImage() works (3 points).
combinedImage() and grayInkedImage() both work (3 points).
inkedImage() works (3 points).
if __name__ == "__main__":. When the grader runs your file as a program, this demo code will run. When the grader imports your file into his/her own grading program, the demo code will not run.