

2012 April 20,
Carleton College, Spring 2012
Prof. Joshua R. Davis, , Goodsell 106B, x4473
In this assignment, you will continue to practice basic Python (loops and functions), you will delve deeper into image processing algorithms, and you will write your own higher-order functions. You will also practice bottom-up design: constructing small, general tools, that can be combined to serve larger, more specific purposes. I have two larger image-processing purposes in mind: green-screening and inking.
You may complete the assignment alone or with a partner. You will submit your work electronically. The assignment is due Tuesday May 1 at 11:59 PM.
If you haven't done the assigned reading from Chapter 6 of our textbook, consider doing so. It might make this assignment much easier. Download a fresh copy of imageexamples.py, and rename it imageprocessing.py. This is the Python program file, where you'll be writing your code.
In our class discussion of image processing, we wrote a mappedImage function to transform any given image by any given RGB function, pixel by pixel. mappedImage is an example of a higher-order function — a function that operates not just on numbers, strings, etc., but also on other functions.
# Transforms each pixel in an image by an RGB function.
# Input: cImage image. Function that takes an RGB color as input, and
# produces an RGB color as output.
# Output: cImage image.
def mappedImage(image, f):
    # Make a new, empty image to hold the result.
    width = image.getWidth()
    height = image.getHeight()
    newImage = cImage.EmptyImage(width, height)
    # Loop over all pixels in the image.
    for row in range(height):
        for col in range(width):
            # Turn the old image's pixel into the new image's color.
            pixel = image.getPixel(col, row)
            rgb = [pixel.getRed(), pixel.getGreen(), pixel.getBlue()]
            newRGB = f(rgb)
            newPixel = cImage.Pixel(newRGB[0], newRGB[1], newRGB[2])
            newImage.setPixel(col, row, newPixel)
    return newImage
We now need a similar tool, called combinedImage, that takes two image files and an RGB function for combining them, and returns the combined image. Write this function in your imageprocessing.py:
# Returns a new image, formed by combining the two given images using
# the given combiner function.
# Input: cImage image. cImage image of the same width and height.
# Function that takes two RGB colors as input, and outputs one RGB color.
# Output: cImage image.
def combinedImage(imageA, imageB, f):
For example, if you define a blending function
# Returns an equal blend of the two given colors.
# Input: RGB color. RGB color.
# Output: RGB color.
def blendedRGB(rgbA, rgbB):
    red = (rgbA[0] + rgbB[0]) / 2
    green = (rgbA[1] + rgbB[1]) / 2
    blue = (rgbA[2] + rgbB[2]) / 2
    return [red, green, blue]
and then load two images (of equal width and height), and invoke combinedImage(imageA, imageB, blendedRGB) on those images, you should get an equal blend of the two images. Test your combinedImage function on this and other RGB combiner functions, of your own invention.
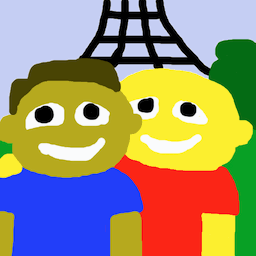
Green-screening is a technique used in movies and television, to superimpose video of actors on video of a background scene, in such a way that the actors appear to be in the scene. We'll do just one frame of video; that is, we'll superimpose a single actor image on a single background image. Here's an example:
Download this actor image and background image to your computer; you'll use them for testing your green-screener. (You can of course try your green-screener on any other images that you find. Just make sure that the actor and background images have the same width and height.) Then, in imageprocessing.py, write the following two functions.
# ???
# Input: RGB color. RGB color.
# Output: RGB color.
def greenScreenedRGB(rgbActor, rgbBackground):

# Returns an image, obtained by green-screening an actor against
# a background.
# Input: cImage image. cImage image.
# Output: cImage image.
def greenScreenedImage(actor, background):
The greenScreenedImage function is quite easy; you can write it in one line of code, using combinedImage and greenScreenedRGB. Implementing greenScreenedRGB is harder. This function needs to detect a particular shade of green and act accordingly. In fact, because a green screen is never perfectly lit, there is always some variation in how green it appears. So greenScreenedRGB must detect a range of greens and act accordingly. You will have to experiment, to see which greens work best with the given actor image. (Your function doesn't have to work for all possible actor images; that would be too hard.) As you can see, my green-screener doesn't work perfectly. Perhaps you can produce better results? Also, write the missing comment for greenScreenedRGB, that describes what the function does.
In this part of the assignment, you'll write an edge detector, which finds all of the edges in an image. Basically, an edge is a sudden change of color. Here's an example:
Our textbook describes an edge detection algorithm, but I would like to do it differently, for a few reasons. First, I want you to understand the algorithm well enough that you can complete this version and then compare it to the book's version. Second, the book's version takes in an RGB image and converts it to grayscale; that is undesirable, because it discards two thirds of the color content of the image. Third, I wish to emphasize that you can build an edge detector from our established basic tools mappedImage, combinedImage, and filteredImage, instead of writing completely new code. To refresh your memory, here is filteredImage:
# Filters the given image with the given kernel, and returns a new image.
# Does not normalize the output to have the same color-value as the input;
# if you want that behavior, then tune your kernel accordingly.
# Input: cImage image. 3x3 list of ints or floats.
# Output: cImage image.
def filteredImage(image, kernel):
    # Make a new, empty image to hold the result.
    width = image.getWidth()
    height = image.getHeight()
    newImage = cImage.EmptyImage(width, height)
    # Loop over all pixels in the image.
    for row in range(1, height - 1):
        for col in range(1, width - 1):
            # Take a weighted sum of the adjacent pixels.
            totalRed = 0
            totalGreen = 0
            totalBlue = 0
            for i in range(3):
                for j in range(3):
                    pixel = image.getPixel(col + i - 1, row + j - 1)
                    totalRed += pixel.getRed() * kernel[i][j]
                    totalGreen += pixel.getGreen() * kernel[i][j]
                    totalBlue += pixel.getBlue() * kernel[i][j]
            # Set the output pixel to that weighted sum.
            newPixel = cImage.Pixel(int(totalRed), int(totalGreen), int(totalBlue))
            newImage.setPixel(col, row, newPixel)
    return newImage
Here is the basic idea of edge detection, as discussed by our book. Filtering an image with the kernel [[-1, -2, -1], [0, 0, 0], [1, 2, 1]] detects horizontal edges. In more detail, the kernel [[-1, -2, -1], [0, 0, 0], [1, 2, 1]] produces large red values wherever the red content of the image increases sharply from top to bottom. And the same goes for the green and blue channels. Similarly, the kernel [[1, 2, 1], [0, 0, 0], [-1, -2, -1]] produces large RGB values wherever the color content of the image decreases sharply from top to bottom. Wherever the color content increases or decreases sharply, we should detect an edge. This leads to the following algorithm for detecting horizontal edges.
The algorithm for detecting vertical edges is identical, except that it uses the kernels [[-1, 0, 1], [-2, 0, 2], [-1, 0, 1]] and [[1, 0, -1], [2, 0, -2], [1, 0, -1]] to detect sharp left-to-right increases and decreases in color content, respectively.
Once you've computed a horizontal edge image and a vertical edge image, you can combine them into a single edge image that detects horizontal, vertical, and diagonal edges. What exactly is the combiner function, that acts on each pixel? In each of the three RGB channels, you have a measure of horizontal edginess and a measure of vertical edginess. For the sake of argument, call these six edginess numbers hr, vr, hg, vg, and hb, vb. Then an edge runs through the pixel if
hr2 + vr2 + hg2 + vg2 + hb2 + vb2 ≥ t2,
where t is some fixed threshold number. Your book recommends a threshold value of 175 (where?). This threshold works well for me, but I invite you to try other threshold values, to see what effect they have.
In imageprocessing.py, write the following function, using the algorithm outlined above. My version consists of four calls to filteredImage and three calls to combinedImage, and nothing else. Of course, you will have to write helper functions to pass to these functions.
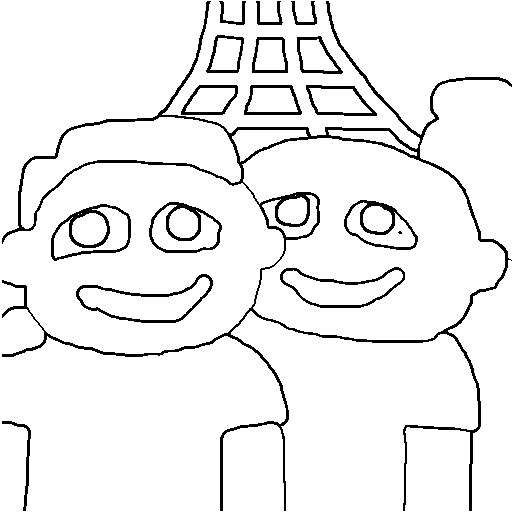
# Returns an image containing only black and white pixels, with the edges
# of the original image in black, and the rest of the image white.
# Input: cImage image.
# Output: cImage image.
def edgeImage(image):
Be sure to test your edgeImage function. Testing it can take a while, if the image you're using is large. You may want to run some of your tests on this smaller image.
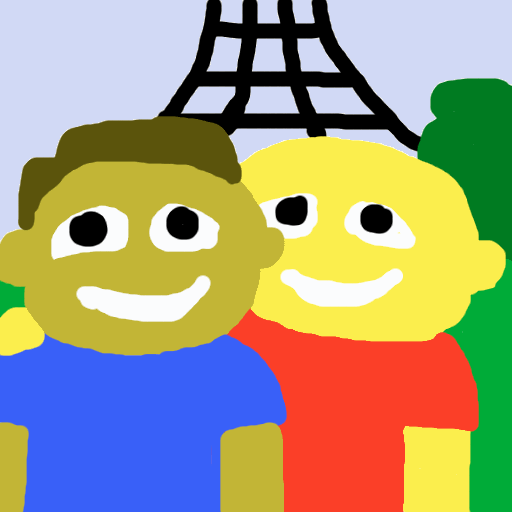
In this last part of the assignment, you will write an inker, which is a function that colors all of the edges in an image black, so that the image looks like it was drawn in ink. This technique is used in many contemporary cartoons, including Futurama and The Simpsons. A complicated background scene, such as a city with many buildings, is difficult to draw by hand, especially if the camera is supposed to move among the buildings in 3D. So these shows render many of their backgrounds using 3D graphics software, post-process these computer-generated images to make them look as if they're drawn in ink and colored by hand, and then superimpose hand-drawn actors. You can see this somewhat in the following still image; the figures are hand-drawn, but the background is computer-generated and post-processed to look like a cartoon.

For a better example, check out a trailer for The Simpsons Movie. Around 1:13, the family is driving in a car that is too good to be hand-drawn. Around 1:47, the bullet shot is too good to be hand-drawn. These shots are computer-generated from 3D models, and then post-processed to look like cartoons.
Your job is to write an inker for 2D still images. Here is an example:
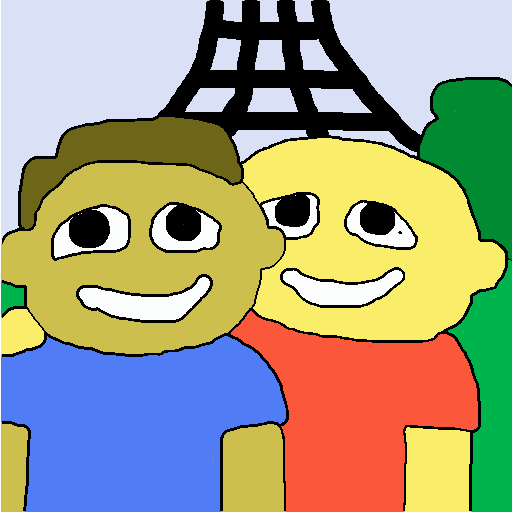
If you've done the rest of this assignment, then you can probably figure out exactly how the inker works. Implement the following function in imageprocessing.py, making as much use of your already-written functions as possible. My version is only two lines of code, plus a helper function.
# Returns a new copy of the image, with all of the edges inked.
# Input: cImage image.
# Output: cImage image.
def inkedImage(image):
In this course, each of your programming assignments is graded in a two-step process. In the first step, the grader tests your code, by loading it as a module into another program. For this to work, your code must obey two rules:
In the second step of grading, the grader reads through your code, to make sure it is sensible. You already know the desiderata here: Your code should be appropriately commented. Each function should be preceded with a comment that explains its purpose, inputs, and outputs. The file should begin with a comment naming the authors. Any extraneous code, that is not required by the assignment, should be removed. The code should be well-tested.
Once you have polished your imageprocessing.py file, submit it electronically on the COURSES server, as usual. It will be graded according to these criteria:
Notice that there are no points for polish. If any part of your code is not polished, then it will be penalized, even if it works correctly.