2017 February 8,
introduction, context, overview
RGB and other color systems
raster vs. vector graphics descriptions
rasterizing a triangle (begin)
Read the syllabus (the course web page). By 11:59 PM of the first day of class, send me e-mail with your answers to these questions:
000helloWorld.c: Study this file, which means: Read it, follow the instructions for compiling and running it, figure out what each line of code does, and try variations if anything is unclear.
000intsDoubles.c: Study this file.
000ifWhileFor.c: Study.
000functions.c: Study.
000pixel.h, 000pixel.o: Download these. Feel free to read 000pixel.h, but you're not expected to understand all of it yet.
000linking.c: Study.
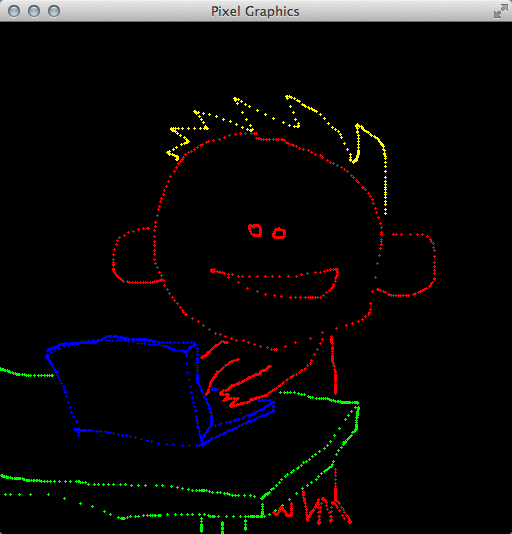
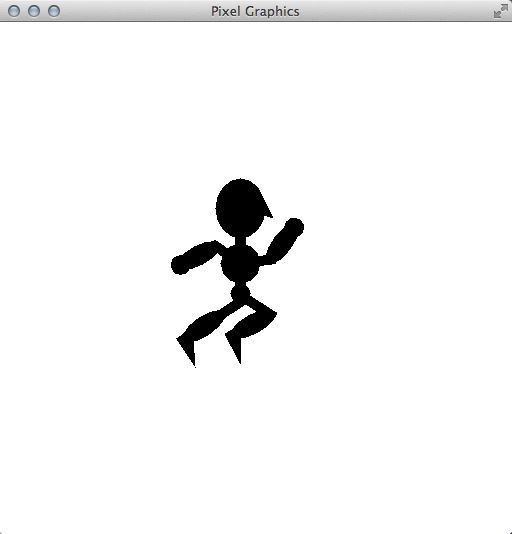
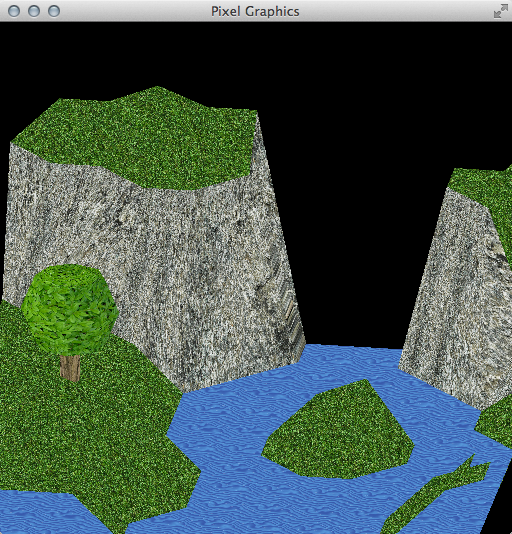
010mainPainting.c: Make a copy of 000linking.c called "010mainPainting.c". Edit this file to make a simple painting program. Your program should make strokes of color whenever the user drags the mouse across the window. (Dragging means moving the mouse cursor while holding down the left mouse button.) Your program should also let the user change the paint color by pressing the R, G, B, C, M, Y, K, and W (white) keys. You may add other features as you like. For example, my program lets the user clear the window and change the brush size. Here's a screenshot:
If you have more time, then feel free to work ahead. Start with 000arrays.c, 000vectors.pdf, and 030vector.c from the next block of homework. If you have even more time, work on 000matrices2By2.pdf, 000matrices2By2.c, and 030matrix.c from the block after that.
rasterizing a triangle (finish)
linear interpolation across a triangle
020triangle.c: Make this file. In it write the following function to rasterize a triangle.
void triRender(double a0, double a1, double b0, double b1, double c0,
        double c1, double r, double g, double b) {

}
The inputs are three vertices of a triangle and an RGB color. Assume that the vertices are in counter-clockwise order, but make no other assumptions. The function calls pixSetRGB, with the given RGB color, for each pixel in the triangle. Write helper functions if you wish.
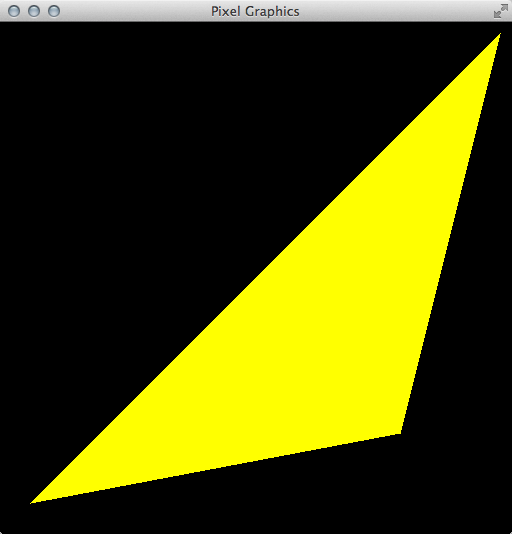
020mainRasterizing.c: Make this file. Near the top, #include 020triangle.c to include your rasterizer code. In the main function, demonstrate that your rasterizer works. Here's a screenshot of mine:
This moment is a benchmark in the course. Make sure that 020triangle.c and 020mainRasterizing.c are functioning, commented, and clean. In comments near the tops of the files, make sure that every student in your work group is credited. Make sure that every student in the group has a copy of these files. Finally, one (and only one) student from the group should submit the files for grading, by dropping them in the hand-in folder on the COURSES file server.
000arrays.c: Study.
000vectors.pdf: Study.
030vector.c: This file specifies the interfaces for various vector functions. Fill in the implementations. (We will add to this file in the coming weeks.)
If you have more time, then work on 000matrices2By2.pdf, 000matrices2By2.c, and 030matrix.c from the next block of homework.
texture mapping
030triangle.c: Make a copy of your 020triangle.c. In it, alter your rasterizer to use C arrays wherever appropriate. For starters, the interface of the triRender function should be changed as follows. In the implementation, a0 becomes a[0], etc.
void triRender(double a[2], double b[2], double c[2], double rgb[3])
030mainInterpolating.c: In a copy of 020mainRasterizing.c, include 030triangle.c rather than 020triangle.c. Update your demonstration code to make sure that the new triRender works, before proceeding to the next steps.
000matrices2By2.pdf: Study.
000matrices2By2.c: Study.
030matrix.c: This file specifies the interfaces for various matrix functions. Fill in the implementations. (We will add to this file in the coming weeks.)
030triangle.c: Implement linear interpolation of color. The interface for triRender is now
void triRender(double a[2], double b[2], double c[2], double rgb[3],
        double alpha[3], double beta[3], double gamma[3])
where the three new parameters are RGB colors. Modulate the interpolated color with the uniform color rgb. Where appropriate, use functions from 030vector.c and 030matrix.c. (But don't #include those files here. They will be included in 030mainInterpolating.c.)
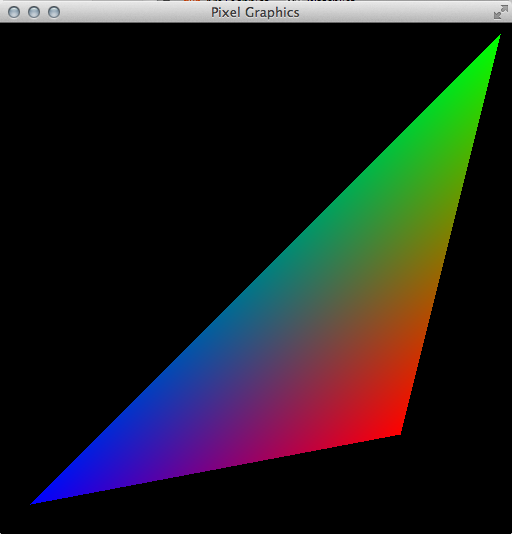
030mainInterpolating.c: Include 030vector.c and 030matrix.c, in addition to 030triangle.c. Demonstrate that your color interpolation works. Here's a screenshot of mine:
If you have more time, then work on 000pointers.c, 000structs.c, and 040texture.c from the next block of homework.
dependent texture reads
abstracting the pixel coloration
000pointers.c: Study.
000structs.c: Study.
stb_image.h: Download. This is a public-domain image-loading library. Despite the ".h" suffix, it's not just function interfaces but also implementations. Read it or don't read it, as you like. Parts of it will be hard to understand unless you know C well. This library is used by a certain function in 040texture.c, which I have already written for you.
040texture.c: This file defines a data type, texTexture, that we use for texture mapping. It's all complete, except that the texSample function is missing one key feature: When asked for quadratic filtering, it responds with nearest-neighbor filtering. You will fill in that feature later in this homework block. For right now, just pretend that filtering is working.
040triangle.c: Update triRender to have the following interface. The quantities being interpolated are now texture coordinates, not colors. Just before you call pixSetRGB, perform a texture lookup using texSample. Modulate that texture RGB by rgb. Pass that modulated color to pixSetRGB.
void triRender(double a[2], double b[2], double c[2], double rgb[3],
        texTexture *tex, double alpha[2], double beta[2], double gamma[2])
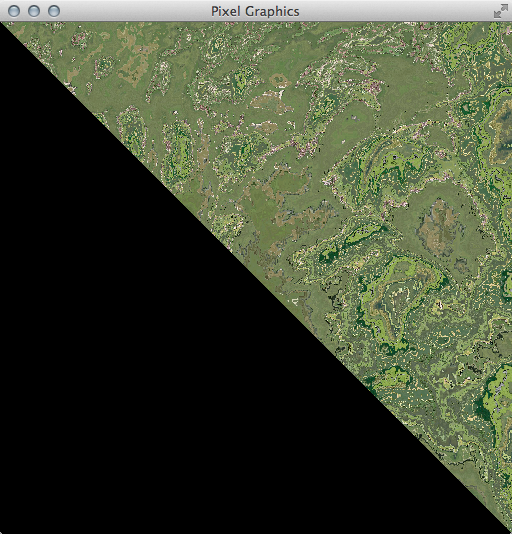
040mainTexturing.c: In a new copy of 030mainInterpolating.c, include 040texture.c and demonstrate your new triRender. Of course, somewhere you'll have to make a texTexture texture to pass to triRender. Use texInitializeFile, and don't forget to texDestroy at the end. Here's a screenshot of mine:

040texture.c: Now let's implement quadratic filtering. Find the relevant part of texSample, and replace it with your own quadratic filtering code. Do not assume that the texels are RGB colors. Instead assume that they are arrays of length tex->texelDim. By reading the specification for the function, you know that you're supposed to store the result in tex->sample, which has been pre-allocated. You will need some scratch space along the way, to hold the results of intermediate computations. That's what tex->aux is for. You should not need more scratch space than tex->aux and tex->sample.
040mainTexturing.c: Add a keyboard handler, so that by pressing GLFW_KEY_ENTER the user can quickly switch between nearest-neighbor and quadratic filtering. It will help you and the grader evaluate your filtering.
This moment is a benchmark for the course. Make sure that 030vector.c, 030matrix.c, 040texture.c, 040triangle.c, and 040mainTexturing.c are functional, clean, and well-commented. Make sure that students are credited properly in comments at the tops of the files. One (and only one) student hands in these files on the COURSES file server. Include the image that is loaded by 040mainTexturing.c.
abstracting the pixel coloration
mesh
050renderer.c: Create this file. Define a struct data type, following 000structs.c, called renRenderer. Right now it just has three int members: unifDim, texNum, and attrDim. As the course progresses, it will serve as a holding bin for rendering settings.
050mainAbstracted.c: Just before you include 050triangle.c, paste the following code. The compile-time constant renATTRDIMBOUND is an upper bound on the size of all attribute arrays in our program. Using it, we can be sure that any attribute arrays we allocate, for example during interpolation calculations, are big enough. The other constants renATTRX, etc. are less crucial to the structure of our program. They are just supposed to help us avoid confusion when parsing our uniform, texel, and attribute arrays. (Arguably we are over-engineering them here. But later in the course we'll have something like 47 uniforms, and parsing them will be harder.)
#define renATTRDIMBOUND 16

#include "050renderer.c"

#define renATTRX 0
#define renATTRY 1
#define renATTRS 2
#define renATTRT 3
#define renATTRR 4
#define renATTRG 5
#define renATTRB 6
#define renUNIFR 0
#define renUNIFG 1
#define renUNIFB 2
#define renTEXR 0
#define renTEXG 1
#define renTEXB 2

/* Sets rgb, based on the other parameters, which are unaltered. attr is an
interpolated attribute vector. */
void colorPixel(renRenderer *ren, double unif[], texTexture *tex[],
        double attr[], double rgb[]) {
    texSample(tex[0], attr[renATTRS], attr[renATTRT]);
    rgb[0] = tex[0]->sample[renTEXR] * unif[renUNIFR] * attr[renATTRR];
    rgb[1] = tex[0]->sample[renTEXG] * unif[renUNIFG] * attr[renATTRG];
    rgb[2] = tex[0]->sample[renTEXB] * unif[renUNIFB] * attr[renATTRB];
}
050triangle.c: Update the interface for triRender to the one below. You now have an array of uniform information, an array of texture pointers, three vectors of vertex attributes, and a renderer that specifies the lengths of those arrays. Assume that the first two attributes in each attribute vector are the screen coordinates, and that they are in counterclockwise order as always. At each rasterized pixel, compute an interpolated attribute array attr of the same dimension as a, b, and c, invoke colorPixel to get an RGB color, and pass this color to pixSetRGB. During interpolation you will need to temporarily allocate some arrays of length ren->attrDim, but you don't know this dimension at compile time. So instead allocate the arrays to have length renATTRDIMBOUND, which is assumed to be at least as large as ren->attrDim. (Do not use malloc or its variants, even if you know that stuff. We don't want to be mallocing many times per second.)
void triRender(renRenderer *ren, double unif[], texTexture *tex[], double a[],
        double b[], double c[])
050mainAbstracted.c: Adjust the rest of this file, to demonstrate that everything is working. Based on the code for colorPixel above, your program will modulate a texture color, interpolated color, and uniform color all together.
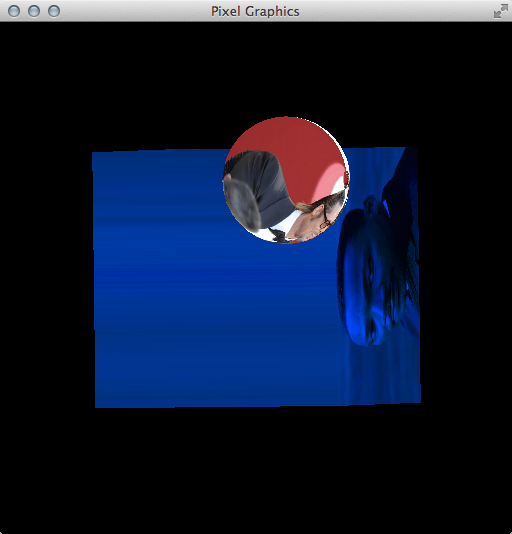
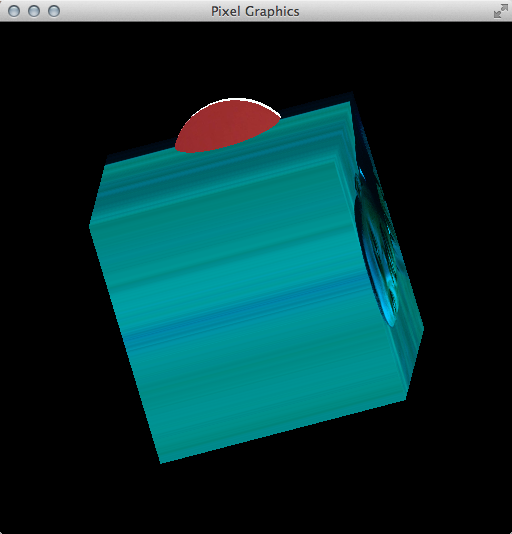
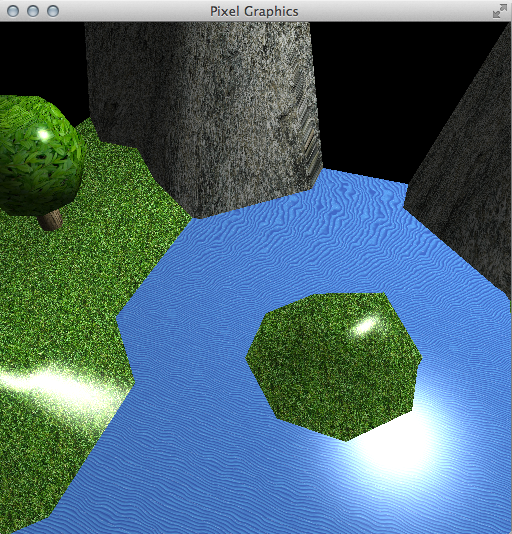
060mainEffect.c: Make an altered copy of 050mainAbstracted.c, that produces an entirely different visual effect. Be creative. My only strict requirement is that your values for ren->unifDim, ren->attrDim, and ren->texNum must be different from the ones used in 050mainAbstracted.c. The core of your work will be an altered colorPixel function. Of course, you will need to edit some of the surrounding code in 060mainEffect.c to configure the renderer and textures. The rest of your files, such as 050triangle.c and 050renderer.c, should be unchanged. E-mail me a screenshot of your program looking cool, that I can show in class. In your e-mail, briefly explain how you made your effect. For example, mine is below. I'm using texture coordinates to look up RGB from a cloud texture, then using the RG from that RGB as texture coordinates for a landscape texture.
If you have more time, then consider cleaning up your code. Or work ahead on any part of the next homework block.
rotation and translation
abstracting the vertex transformation
000variableArity.c: Study.
070vector.c: Make a copy of 030vector.c. In it, implement the following function, which is used in 070mesh.c. Don't include stdarg.h (although that wouldn't be bad); you'll include it into 070mainMesh.c.
/* Assumes that there are dim + 2 arguments, the last dim of which are doubles.
Sets the dim-dimensional vector v to those doubles. */
void vecSet(int dim, double v[], ...)
070mesh.c: This file implements a data type for triangular meshes. Skim it. You will see initializer functions, accessor functions, a destroyer function, and convenience functions for building common kinds of meshes. There's also meshRender. Fill in its implementation, using other functions such as meshGetTrianglePointer, meshGetVertexPointer, and triRender. Don't overlook the part of the specification about attrDim.
070mainMesh.c: Include stdarg.h near the other headers. Include 070mesh.c after 050triangle.c. Demonstrate that your mesh renderer is working correctly. I recommend using the convenience mesh builders and one texture.
080renderer.c: Now we start adding rotation and translation, which unfortunately requires changes to multiple parts of the engine. For starters, add a varyDim member to the renderer struct.
080triangle.c: This code will never again see an attribute vector. It will see varying vectors instead. Replace renATTRDIMBOUND with renVARYDIMBOUND and ren->attrDim with ren->varyDim. When I did this, my code had a bunch of variables and comments that referred to attributes, so I had to clean those up too.
080mainPosable.c: Replace renATTRDIMBOUND with renVARYDIMBOUND. Add renVERTNUMBOUND to serve as a bound on the number of vertices in a mesh. Add renVARYX, etc. In colorPixel, replace attr with something like vary, renATTRX with renVARYX, etc. Somewhere near colorPixel, add the transformVertex code below. And don't forget to initialize the varyDim member of your renderer somewhere in this file.
/* Writes the vary vector, based on the other parameters. */
void transformVertex(renRenderer *ren, double unif[], double attr[],
        double vary[]) {
    /* For now, just copy attr to varying. Baby steps. */
    vary[renVARYX] = attr[renATTRX];
    vary[renVARYY] = attr[renATTRY];
    vary[renVARYS] = attr[renATTRS];
    vary[renVARYT] = attr[renATTRT];
}
080mesh.c: This is the big change. Declare, as a global variable, an array to hold renVARYDIMBOUND * renVERTNUMBOUND doubles. In meshRender, use transformVertex to transform all of the attributes to varying, storing the latter in your big global array. Then march through the triangles, drawing with the varying vectors rather than the attribute vectors.
080mainPosable.c: Everything up to this point should be working. Test it. Then add three uniforms to express rotation and translation, and implement the rotation and translation in transformVertex. Test it. Here's mine:
If you have more time, then you might get started on the next block of homework.
scene graph
homogeneous coordinates
000functionPointers.c: Study.
090renderer.c: Add colorPixel and transformVertex members to the renderer struct. They are function pointers.
090mesh.c: Replace transformVertex with ren->transformVertex.
090triangle.c: Replace colorPixel with ren->colorPixel.
090mainScene.c: Configure your renderer so that its colorPixel and transformVertex members point to your functions defined here. Test. Everything should be working as usual. (By the way, you now have much more freedom, in where you place these functions in 090mainScene.c.)
000matrices3By3.pdf: Study.
090matrix.c: In a copy of 030matrix.c, add these three functions and their implementations.
/* Multiplies the 3x3 matrix m by the 3x3 matrix n. */
void mat333Multiply(double m[3][3], double n[3][3], double mTimesN[3][3])

/* Multiplies the 3x3 matrix m by the 3x1 matrix v. */
void mat331Multiply(double m[3][3], double v[3], double mTimesV[3])

/* Builds a 3x3 matrix representing 2D rotation and translation in homogeneous
coordinates. More precisely, the transformation first rotates through the angle
theta (in radians, counterclockwise), and then translates by the vector (x, y).
*/
void mat33Isometry(double theta, double x, double y, double isom[3][3])
090mainScene.c: Add 9 new uniforms, which will hold a 3 x 3 matrix. Somewhere near colorPixel and transformVertex, define and implement the following updateUniform function. Also alter transformVertex so that it transforms the screen location of the vertex by the 3 x 3 matrix stored in the uniforms. The details of both functions depend on exactly how you have chosen to format your uniform vector. Because unpacking part of an array into a matrix is a little tricky in C, I have included my entire updateUniform code below. Adjust it to work with your uniforms.
/* If unifParent is NULL, then sets the uniform matrix to the
rotation-translation M described by the other uniforms. If unifParent is not
NULL, but instead contains a rotation-translation P, then sets the uniform
matrix to the matrix product P * M. */
void updateUniform(renRenderer *ren, double unif[], double unifParent[]) {
    if (unifParent == NULL)
        /* The nine uniforms for storing the matrix start at index
        renUNIFISOMETRY. So &unif[renUNIFISOMETRY] is an array containing those
        nine numbers. We use '(double(*)[3])' to cast it to a 3x3 matrix. */
        mat33Isometry(unif[renUNIFTHETA], unif[renUNIFTRANSX],
            unif[renUNIFTRANSY], (double(*)[3])(&unif[renUNIFISOMETRY]));
    else {
        double m[3][3];
        mat33Isometry(unif[renUNIFTHETA], unif[renUNIFTRANSX],
            unif[renUNIFTRANSY], m);
        mat333Multiply((double(*)[3])(&unifParent[renUNIFISOMETRY]), m,
            (double(*)[3])(&unif[renUNIFISOMETRY]));
    }
}
090renderer.c: Add an updateUniform member to the renderer struct. It's a function pointer, of course.
090scene.c: This is a tree data structure, implemented atop a binary tree using the first-child-next-sibling trick. Most of the functions are already written, including an initializer and a destroyer. Your job is to implement sceneRender. It first calls ren->updateUniform. Then it draws the node. Then it recursively draws the node's descendants (if any) and the node's younger siblings (if any).
090mainScene.c: Don't forget to initialize the renderer's updateUniform member somewhere in here. Make a scene graph of at least four nodes and height at least two (three "generations"), to demonstrate that your code is working. Here's a screenshot of mine:
This is a benchmark for the course. You will hand in 090mainScene.c and all of the files on which it depends. Make sure your files are functional, clean, and commented. Make sure that all contributors are credited. Make sure that all contributors have copies of the files. One student then uploads the files to COURSES.
transition to 3D
mesh
backface culling
000vectorsMore.pdf: Study.
100vector.c: Implement the following functions.
/* Returns the dot product of the dim-dimensional vectors v and w. */
double vecDot(int dim, double v[], double w[])

/* Returns the length of the dim-dimensional vector v. */
double vecLength(int dim, double v[])

/* Returns the length of the dim-dimensional vector v. If the length is
non-zero, then also places a scaled version of v into the dim-dimensional
vector unit, so that unit has length 1. */
double vecUnit(int dim, double v[], double unit[])

/* Computes the cross product of the 3-dimensional vectors v and w, and places
it into vCrossW. */
void vec3Cross(double v[3], double w[3], double vCrossW[3])

/* Computes the 3-dimensional vector v from its spherical coordinates.
rho >= 0.0 is the radius. 0 <= phi <= pi is the co-latitude. -pi <= theta <= pi
is the longitude or azimuth. */
void vec3Spherical(double rho, double phi, double theta, double v[3])
000matrices4By4.pdf: Study.
100matrix.c: Implement the following functions. You might find it useful to implement helper functions such as mat33Add and mat33Transpose. That's up to you.
/* Given a length-1 3D vector axis and an angle theta (in radians), builds the
rotation matrix for the rotation about that axis through that angle. Based on
Rodrigues' rotation formula R = I + (sin alpha) U + (1 - cos alpha) U^2. */
void mat33AngleAxisRotation(double alpha, double axis[3], double rot[3][3])

/* Given two length-1 3D vectors u, v that are perpendicular to each other.
Given two length-1 3D vectors a, b that are perpendicular to each other. Builds
the rotation matrix that rotates u to a and v to b. */
void mat33BasisRotation(double u[3], double v[3], double a[3], double b[3],
        double rot[3][3])

/* Multiplies m by n, placing the answer in mTimesN. */
void mat444Multiply(double m[4][4], double n[4][4], double mTimesN[4][4])

/* Multiplies m by v, placing the answer in mTimesV. */
void mat441Multiply(double m[4][4], double v[4], double mTimesV[4])

/* Given a rotation and a translation, forms the 4x4 homogeneous matrix
representing the rotation followed in time by the translation. */
void mat44Isometry(double rot[3][3], double trans[3], double isom[4][4])

/* Given a rotation and translation, forms the 4x4 homogeneous matrix
representing the inverse translation followed in time by the inverse rotation.
That is, the isom produced by this function is the inverse to the isom
produced by mat44Isometry on the same inputs. */
void mat44InverseIsometry(double rot[3][3], double trans[3],
        double isom[4][4])
100mesh.c: This file contains a new section with convenience functions for building 3D meshes. Their attribute dimensions are 3 + 2 + 3 = 8. We'll talk about the last three attributes later in the course. This file also contains an unimplemented meshRender. Merge it with your 090mesh.c, so that you have both 3D meshes and meshRender. This is just copying and pasting.
???triangle.c: It is now possible that triRender will be passed a clockwise-ordered triangle. When that happens, it should ignore the triangle (draw nothing). My code has always (since 020triangle.c) done this backface culling automatically, by checking that the determinant returned by mat22Invert is positive. If that is not true for you, then you need to implement this feature in 100triangle.c. The details depend on your triRender algorithm. For example, some students reorder the vertices into clockwise order, which their algorithm then rasterizes. They might consider a cross product test before reordering, instead of my determinant test after reordering. If you don't know what I'm talking about, then re-read 000vectorsMore.pdf.
100main3D.c: March through this file, changing everything necessary, as we did in class. You probably want three uniforms for translation instead of two. The uniforms should store a 4x4 rotation-translation matrix instead of a 3x3. Change updateUniform to set this uniform matrix to the 4x4 identity matrix. (Later in this homework, we'll set it to something useful.) Change transformVertex to perform the 4x4 transformation. Build a scene graph of height at least one (one parent, one child) with 3D meshes in the nodes. Don't forget to set your renderer's attribute dimension (to 3 + 2 + 3, if you're using the convenience mesh builders). Check that your code so far is working (even if it looks terrible).
100main3D.c: 3D graphics is pointless if there is no animation or user interaction. So make some kind of user interface handler that rotates your scene. For example, you might add uniforms for α, φ, and θ, use the latter two as spherical coordinates to make an axis u, use α and u in mat33AngleAxisRotation, and make your handler change α. Don't forget to hook your rotation and translation into updateUniform. Demonstrate that all of your code is working, with a scene graph of height at least one. (The nodes will not interact perfectly with each other, until we implement the depth test.)
depth test
interlude: debugging pointers and other common C problems
Today's homework should take much less time than typical homework in this course. Use your extra time to debug and polish your code. I have one particular request: updateUniform, transformVertex, and colorPixel should be functions of their parameters alone. They should not access any other data, such as global variables, that are not passed in the parameters. If your code violates this policy, then clean it up — probably by passing more information in uniforms.
110depth.c: Download and read this file. In essence, it lets us add a depth channel to our RGB rendering window.
110renderer.c: Add a depthBuffer *depth member to the renderer struct, so that all parts of our engine will be able to access the depth buffer through the renderer.
110triangle.c: colorPixel no longer outputs an RGB array. Now it outputs an RGBZ array, where the last entry is the Z-component of the pixel. In triRender, compare this Z-value to the one in the depth buffer. If the former is greater than the latter, then update the latter and call pixSetRGB.
110mainDepth.c: Make a depth buffer and hook it to the renderer. On each frame, around the time that you clear the pixel buffer, also clear the depth buffer. Update your varyings, transformVertex, and colorPixel, so that a Z-value is able to arrive at the depth test. Test your program.
camera
orthographic projection
viewport
This is another short homework assignment. Use your extra time to catch up, debug, polish, etc. The next homework will be longer. By the way, I have uploaded a new version of 100mesh.c, with more 3D mesh builders.
120renderer.c: Add struct members cameraRotation (a 3 x 3 matrix), cameraTranslation (a 3-dimensional vector), and viewing (a 4 x 4 matrix). Paste in the following functions. The first two are done. Implement the third function using mat44InverseIsometry.
/* Sets the camera's rotation and translation, in a manner suitable for third-
person viewing. The camera is aimed at the world coordinates target. The camera
itself is displaced from that target by a distance rho, in the direction
specified by the spherical coordinates phi and theta (as in vec3Spherical).
Under normal use, where 0 < phi < pi, the camera's up-direction is world-up, or
as close to it as possible. */
void renLookAt(renRenderer *ren, double target[3], double rho, double phi,
        double theta) {
    double z[3], y[3], yStd[3] = {0.0, 1.0, 0.0}, zStd[3] = {0.0, 0.0, 1.0};
    vec3Spherical(1.0, phi, theta, z);
    vec3Spherical(1.0, M_PI / 2.0 - phi, theta + M_PI, y);
    mat33BasisRotation(yStd, zStd, y, z, ren->cameraRotation);
    vecScale(3, rho, z, ren->cameraTranslation);
    vecAdd(3, target, ren->cameraTranslation, ren->cameraTranslation);
}

/* Sets the camera's rotation and translation, in a manner suitable for first-
person viewing. The camera is positioned at the world coordinates position.
From that position, the camera's sight direction is described by the spherical
coordinates phi and theta (as in vec3Spherical). Under normal use, where
0 < phi < pi, the camera's up-direction is world-up, or as close to it as
possible. */
void renLookFrom(renRenderer *ren, double position[3], double phi,
        double theta) {
    double negZ[3], y[3];
    double yStd[3] = {0.0, 1.0, 0.0}, negZStd[3] = {0.0, 0.0, -1.0};
    vec3Spherical(1.0, phi, theta, negZ);
    vec3Spherical(1.0, M_PI / 2.0 - phi, theta + M_PI, y);
    mat33BasisRotation(yStd, negZStd, y, negZ, ren->cameraRotation);
    vecCopy(3, position, ren->cameraTranslation);
}

/* Updates the renderer's viewing transformation, based on the camera. */
void renUpdateViewing(renRenderer *ren) {
    /* Your job is to implement this function!! */
}
120mainCamera.c: Add 16 new uniforms to hold a 4 x 4 viewing matrix. At the start of each animation frame, call renUpdateViewing to make sure that ren->viewing is up-to-date. In updateUniform, load ren->viewing into the uniforms. In transformVertex, apply that viewing transformation after the modeling transformation (the one from the scene graph). You should also add some keyboard or mouse controls, to let the user control the camera.
This is a benchmark for the course. You will hand in 120mainCamera.c and all of the files on which it depends. Make sure your files are functional, clean, and commented. Make sure that all contributors are credited. Make sure that all contributors have copies of the files. One student then uploads the files to COURSES.
If you have more time, then you might get started on the orthographic projection and viewport transformation (but not perspective) in the next homework block.
perspective projection
near-plane clipping
other clipping
130matrix.c: Implement the following functions, using the matrices described in class.
/* Builds a 4x4 matrix representing orthographic projection with a boxy viewing
volume [left, right] x [bottom, top] x [far, near]. That is, on the near plane
the box is the rectangle R = [left, right] x [bottom, top], and on the far
plane the box is the same rectangle R. Keep in mind that 0 > near > far. Maps
the viewing volume to [-1, 1] x [-1, 1] x [-1, 1]. */
void mat44Orthographic(double left, double right, double bottom, double top,
        double far, double near, double proj[4][4])

/* Builds a 4x4 matrix that maps a projected viewing volume
[-1, 1] x [-1, 1] x [-1, 1] to screen [0, w - 1] x [0, h - 1] x [-1, 1]. */
void mat44Viewport(double width, double height, double view[4][4])

/* Builds a 4x4 matrix representing perspective projection. The viewing frustum
is contained between the near and far planes, with 0 > near > far. On the near
plane, the frustum is the rectangle R = [left, right] x [bottom, top]. On the
far plane, the frustum is the rectangle (far / near) * R. Maps the viewing
volume to [-1, 1] x [-1, 1] x [-1, 1]. */
void mat44Perspective(double left, double right, double bottom, double top,
        double far, double near, double proj[4][4])
130renderer.c: Merge this file with your old renderer code, so that it contains the features of both. Then add a double array projection[6] to the renderer struct. Also add one int projectionType and a 4 x 4 viewport. Alter renUpdateViewing so that it incorporates the projection into ren->viewing, based on projection and projectionType, and loads the viewport transformation into ren->viewport. How does it know the width and height? From its depth buffer.
130mainProjection.c: In transformVertex, perform the modeling and viewing transformations. Then divide the homogeneous coordinates by their last coordinate, to make their last coordinate 1. Then perform the viewport transformation. Make a demo to verify that your code is working. For example, you might install keyboard controls to let the user adjust some global variables, which you then feed into renSetFrustum just before you draw. Warning: Because we have not yet implemented near-plane clipping, you need to make sure that your meshes are safely in front of the camera. If any vertex comes near the camera plane, then you might get weird visual artifacts or even fatal division-by-zero errors.
To prepare for clipping, we must refactor the code, so that the homogeneous division and the viewport transformation happen outside transformVertex, just before triRender. We cannot pass just XYZ through varying. We must pass all four homogeneous coordinates, XYZW, where W might or might not equal 1. So here are the changes.
140mesh.c: In meshRender, call clipRender instead of triRender. The two functions take the same arguments as each other, so you don't need to change the arguments at all.
140clipping.c: In this new file, write a function clipRender. It takes the same arguments as triRender. First it performs the homogeneous division on XYZW to make W equal to 1. Then it performs the viewport transformation. Then it calls triRender.
140mainClipping.c: Include 140clipping.c. Change the varyings so that they start with XYZW instead of just XYZ. In transformVertex, remove the homogeneous division and the viewport transformation, and make sure that it produces varyings that start with XYZW. Check that your program works exactly as 130mainProjection.c did, before proceeding.
Now we are ready to implement clipping at the near plane. If you cannot complete this work for Monday, then try to complete it before our exam.
140clipping.c: Implement the near-plane clipping algorithm discussed in class. Here is the short version. A clipping-space (post-projection, pre-division) vertex XYZW is clipped if either Z > W or W ≤ 0. If all three vertices in a triangle are clipped, then the entire triangle is clipped. If two vertices are clipped, then the triangle is clipped to a smaller triangle. If one vertex is clipped, then the triangle is clipped to two smaller triangles. If no vertices are clipped, then the triangle is not clipped at all. The vertices of the smaller triangles are found by linear interpolation in clipping space. More specifically, suppose that vertex a is clipped and vertex b is not. Then a + t (b - a) is where the clipping plane intersects the triangle side from a to b, with t = (a3 - a2) / (a3 - a2 + b2 - b3). The linear interpolation applies to not just the XYZW coordinates, but to the entire varying vector. And all of this happens before the homogeneous division. Once you have implemented this algorithm, try running 140mainClipping.c again. There should be no visual or fatal errors when vertices come near the camera plane.
110triangle.c: Ever since we introduced the depth buffer, triRender has had access to the width and height of the window. So it can save some time by never trying to rasterize pixels that are beyond the borders of the window. Implement this easy form of clipping at the side planes.
140mainClipping.c: This feature is optional; I don't do it myself. When clearing the depth buffer, consider clearing it to -1. This is an easy (but not especially fast) way of clipping at the far plane.
Except for lighting, our 3D graphics engine is functionally complete. We won't edit any files in the engine anymore (except for main.c). So this is a good time to polish and optimize your code.
surface normals
diffuse lighting
None. Study for the exam. But keep in mind that clipping is on the exam, and you will submit all code up to this point on Friday.
Exam: The exam is on paper, in class. No computers, notes, or other aids are allowed. The exam covers all material up to and including clipping. It does not cover lighting. My intent is to test your knowledge of graphics, not your knowledge of C or linear algebra (although C and linear algebra might help you answer graphics questions). Here are some study questions.
This is a benchmark for the course. You will hand in 140mainClipping.c and all of the files on which it depends. Make sure your files are functional, clean, and commented. Make sure that all contributors are credited. Make sure that all contributors have copies of the files. One student then uploads the files to COURSES.
specular lighting
ambient lighting
attenuation
fog
160mainDiffuse.c: Add three uniforms for the world position of a light, and three more uniforms for the RGB color of that light. Add three varyings for the world position of a triangle vertex, and three more varyings for the world unit normal vector at that vertex. In updateUniform, write the uniforms. In transformVertex, write the varyings. (The 3D meshes built by the functions in 100mesh.c, and later versions, have unit normals as attributes 5, 6, 7.) In colorPixel, use these uniforms and varyings to implement diffuse reflection. (Don't forget to rescale the varying normal, to make it unit.) Demonstrate that all of your code is working.
170mainSpecular.c: For simplicity let's assume that the surface's specular color (the color of its "clear coat") is white. Add three uniforms for the camera's world position. In updateUniform, write them. In colorPixel, implement specular reflection using the dot product of the unit camera direction and the unit reflection direction. Somewhere you need to get shininess; either hard-code it into colorPixel, or make it another uniform, or get it from texture. Do not remove diffuse reflection; add the two reflected colors to make the final pixel color. Demonstrate that all of your code is working.
180mainAmbient.c: Implement ambient reflection. Don't over-engineer it. Make it a small percentage of the light RGB, and add it to the diffuse and specular reflections. Here's a screenshot of mine.
190mainFog.c: Implement a simple fog effect. Objects at the near plane should appear in their usual color (no fog). Objects at the far plane should appear gray (complete fog). Between the near and far planes, the fog effect should ramp up smoothly. If you set your background to the same gray as the fog, then it should all look good.