2021 February 19,
The second part of CS 311 deals with the same triangle rasterization algorithm as in the first part. Instead of implementing the algorithm ourselves, we learn how to use OpenGL to run the algorithm at high speed on a graphics processing unit (GPU). Then we layer extra features atop the basic algorithm, to make a software system that is more polished and practical.
Today's work has two goals. The conceptual goal is to understand the distinction between the CPU/RAM and the GPU/VRAM, and what it means to shift work to the GPU. The practical goal is to get acquainted with OpenGL 3.2.
At the start of the course, you followed the setup instructions, but you might have postponed the GL3W part. If so, then do it now. If you don't succeed (which you might not know until you run 300mainOpenGL32.c), then consult Mike Tie, and plan on using Carleton's macOS machines remotely — at least temporarily.
We do some of these tutorials in class. Do the others now. The most important one is 300mainOpenGL32.c.
300mainGLFW.c: Skim. Focus on the render function.
300mainOpenGL14.c: Skim, focusing on render.
300mainOpenGL15.c: Skim, focusing on render. What is the big change from 1.4 to 1.5, and why?
300shading.c: Study. This file offers helper functions for making shader programs. Most of the code is error checking.
300mainOpenGL20.c: Skim. What is the big change from 1.5 to 2.0?
300mainOpenGL20b.c: Skim, focusing on the comments. The change from the previous tutorial is small. What is it?
300mainOpenGL32.c: Study. There are several changes. You don't need to understand what every line of code does — that's the nature of interacting with an opaque system such as OpenGL — but in the coming days you need to understand what each commented chunk of code does, so that you can reorganize this program. And even though you've never been taught any GLSL, can you understand what the GLSL code does?
OpenGL declares its own versions of the C data types. For example, GLdouble might be the same thing as double, but it might not. We must alter our code to guarantee compatibility.
310vector.c: In a copy of your most recent vector.c, replace all doubles with GLdoubles.
310matrix.c: In a copy of your most recent matrix.c, replace all doubles with GLdoubles.
310shading.c: Skim. This upgrade to 300shading.c defines a class that packages a shader program with its uniform and attribute locations for easy use. (Also I've replaced some doubles with GLdoubles.)
310mainCompatibility.c: Start with a copy of 300mainOpenGL32.c. You might want to delete some of the comments. Include the "310" versions of the files instead of their old versions. In render (and nowhere else), replace doubles with GLdoubles. Test. The program should work exactly as it did earlier.
Although we're already #includeing 310shading.c, we haven't yet taken advantage of the shaShading class that it defines. So let's do that.
320mainShading.c: Start with a copy of 310mainCompatibility. Carefully identify all of the lines of code that deal with the shader program, and compare them to the shaShading class code. Replace those lines with code to initialize, use, and destroy a shaShading object. That object should be your only global variable related to shader programs. You might find the C code below helpful. Test. The program should work exactly as it did earlier.
#define UNIFVIEWING 0
#define UNIFMODELING 1
#define ATTRPOSITION 0
#define ATTRCOLOR 1

const GLchar *unifNames[2] = {"viewing", "modeling"};
const GLchar *attrNames[2] = {"position", "color"};
Clean up and hand in 310mainCompatibility.c, 320mainShading.c, and their dependencies.
If you have time, then get started on the next day's homework. You know everything that you need to know for the first couple of sections.
The goal of today's work is to finish reproducing the features of our software graphics engine. We need meshes, isometries, cameras, and textures. Then we'll be caught up.
300string.c: This is the example I used in class, to explain how highly abstracted systems such as OpenGL are often slower than less-abstracted systems such as Vulkan. Study it or ignore it as you like.
330mesh.c: Skim. I've deleted meshRender and its helper functions. I've replaced all doubles with GLdoubles. I've replaced all ints with GLuints. (The latter are unsigned. The former were never negative anyway.) I've also deleted a few 0 <= and 0 > tests, because they are now vacuous.
330mesh2D.c: Skim. The changes are similar to those in 330mesh.c.
330mesh3D.c: Skim. The changes are similar to those in 330mesh.c.
330meshGL.c: This file defines a class with four unimplemented methods. Study the comments to understand what each method should do. Implement the methods by mimicking the relevant parts of 300mainOpenGL32.c. Here's an important detail, which simplifies your task: The vertex and triangle arrays in meshMesh are laid out in exactly the way that OpenGL wants them.
330mainMesh.c: Start with a copy of 320mainShading.c. Update all of the mesh-handling code so that it uses meshGLMesh. Is that a daunting task? I recommend the following five steps. First, delete the ...OFFSET macros, because they're now in 330meshGL.c. Second, replace the global variables, that used to hold the mesh, with one global variable of type meshGLMesh. Third, in destroyScene, destroy the meshGLMesh. Fourth, in render, render the meshGLMesh. Fifth, in initializeMesh, there are several changes. Keep the attributes and triangles variables as they are. Use meshInitialize, meshSetTriangle, and meshSetVertex to make a meshMesh out of them. Use meshGLInitialize and meshGLFinishInitialization, with the required code between them, to initialize the global meshGLMesh. Destroy the meshMesh. Test. The program should work exactly as it did earlier.
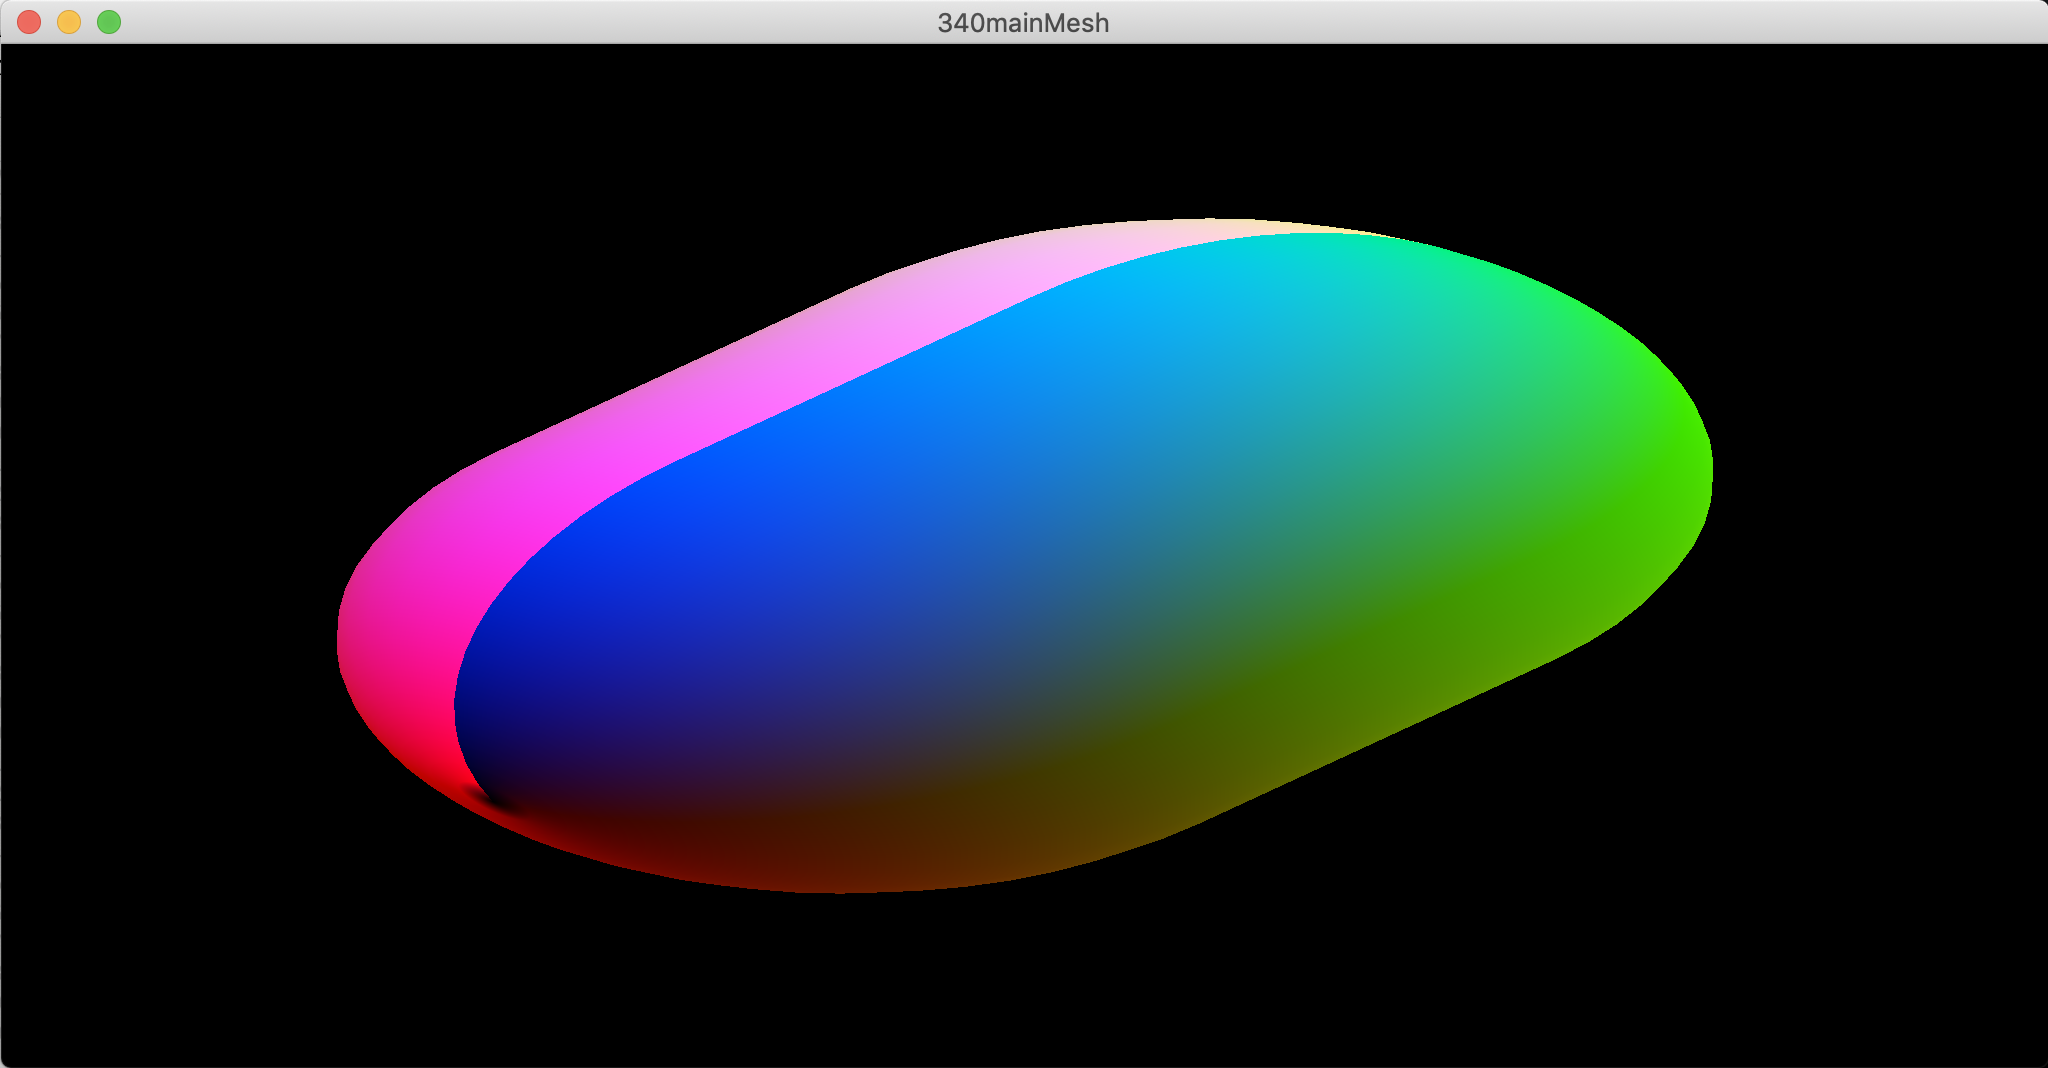
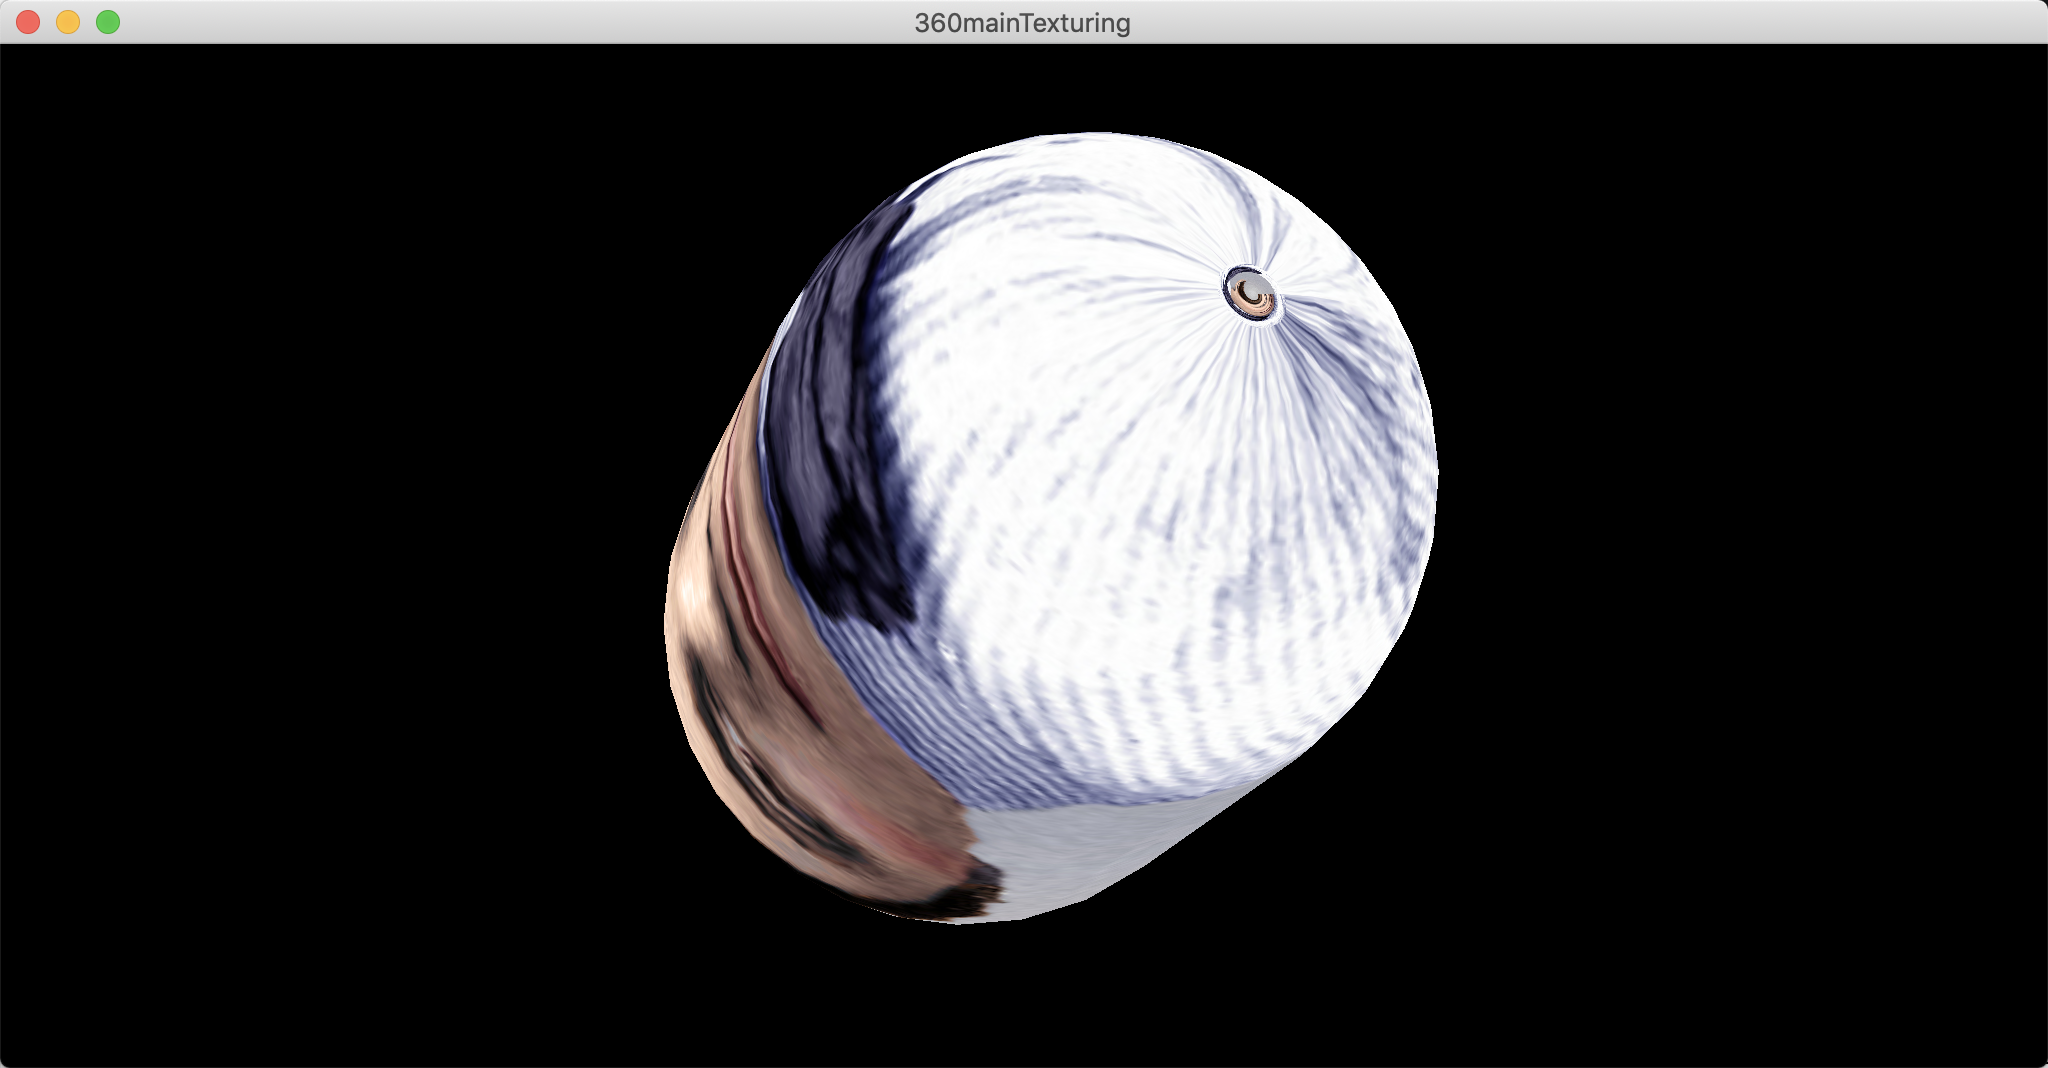
340mainMesh.c: Start with a copy of 330mainMesh.c. If you still have TRINUM, VERTNUM, and ATTRDIM, then delete them. In initializeMesh, replace the manually constructed cube mesh with a mesh from 330mesh3D.c. In configuring the VAO, replace ATTRDIM with the mesh's attrDim. There is a slight issue, that your shader program wants XYZRGB attributes, but you're giving it XYZSTNOP attributes. That's okay. You can pretend that STN values are RGB values. Here's a screenshot:
Can you tell that the capsule in the screenshot above is distorted? Probably your imagery is distorted too. It's because we're still using a simplistic projection. This cannot stand.
350isometry.c: In a copy of your most recent isometry.c, replace all doubles with GLdoubles.
350camera.c: In a copy of your most recent camera.c, replace all doubles with GLdoubles.
350mainCamera.c: Start with a copy of 340mainMesh.c. Declare a global variable for the camera. In initializeScene, configure it using the window's initial width and height. In render, send its viewing transformation P C-1 to the viewing location. Also, there's one more thing to do. Re-read 300mainOpenGL32.c if you don't know what I mean.
While incorporating texture mapping, you get to practice with some of the GLSL that we've learned in class. A crucial feature of GLSL is that the compiler tries to optimize out any unused variables. Consequently, you can't pass data into shaders, leave it unused, test, and then write the code to use that data. Instead, work in the opposite order: Write shader code that uses dummy values for the data, test, and then pass the actual data in. You can see this approach in the baby steps below.
360texture.c: Study. This is like our old friend 040texture.c. Instead of keeping the texture data in the texTexture object, it sends the data to the GPU and keeps only a GLuint identifier for it, like a tag for a coat check at a tiny museum.
360mainTexturing.c: Start with a copy of 350mainCamera.c. Declare a texTexture object as a global variable. As part of initializing and destroying the scene, initialize and destroy the texture object. Test. Your program should produce the same output as it did earlier, because you are not yet using the texture.
360mainTexturing.c: First, we need a uniform to make the texture available to the fragment shader. Use the three lines of GLSL code below, putting each one in its correct place in the fragment shader. Also, enlarge the uniform names that you pass to shaInitialize. Second, insert a call to texRender just before, and a call to texUnrender just after, calling meshGLRender. Test. Your mesh should be rendering in a single color. Why?
uniform sampler2D texture0;
vec3 rgbFromTex = vec3(texture(texture0, vec2(0.5, 0.5)));
fragColor = vec4(color * rgbFromTex, 1.0);
360mainTexturing.c: In the preceding code snippet, we sampled at texture coordinates (S, T) = (0.5, 0.5), just because we didn't have texture coordinates connected yet. So let's finally connect them. First, replace the vec3 color attribute with a vec2 texCoord attribute (or whatever name you prefer, within reason). This change requires edits to the vertex shader and several parts of the C code. Second, edit the vertex shader so that it passes the texture coordinates, rather than a color, to the fragment shader. Third, edit the fragment shader so that it receives the texture coordinates and uses them in sampling the texture, where you formerly had vec2(0.5, 0.5). Here's a screenshot of mine:
Clean up and hand in 330mainMesh.c, 340mainMesh.c, 350mainCamera.c, 360mainTexturing.c, and their dependencies.
Today's assignment is short, in recognition that the assignments around it are a bit long.
370node.c: Skim. This file defines a class for scene graph nodes. The nodeRender method is only partially implemented. Finish that method. To clarify, the node's auxiliaries are responsible for storing any uniform numbers specific to that mesh. They are not responsible for scene-wide uniforms such as the viewing transformation. (And, by the way, my implementation adds 17 lines of code.)
370mainScene.c: Start with a copy of 360mainTexturing.c. Keep the code that initializes and destroys the mesh and texture, but replace all other mesh, texture, and isometry code with a single nodeNode and its methods. That is, you should initialize, animate, render, and destroy a single scene graph node. Test. The program should work exactly as it did earlier.
I'm giving you a scene that is rich enough to stress-test your present and future code. There are several important features.
The scene depicts a temperate forest/grassland environment, because I am biased toward that, but you should feel free to change the details. For example, you could make the ground snowy for an Arctic scene or sandy for a Saharan scene. You could change the design of the plants. You could tweak the robot giraffe baby's legs, so that they properly attach to its body. Do what you want, as long as you maintain the desiderata listed above.
Texture Pack: On our course Moodle site, in the section for this week's videos, you can find a ZIP archive of the textures that I use. Feel free to replace them with your own textures. However, the stained glass texture needs to have a black border. (And, as always, don't be surprised if our image loader doesn't work on certain files. It works on the files in my texture pack.)
380artwork.c: Study. For example, you should be able to draw the scene graph. Also, you should be able to figure out the world coordinates of the stained glass window.
temple.txt: A mesh file for a certain mesh used in the scene.
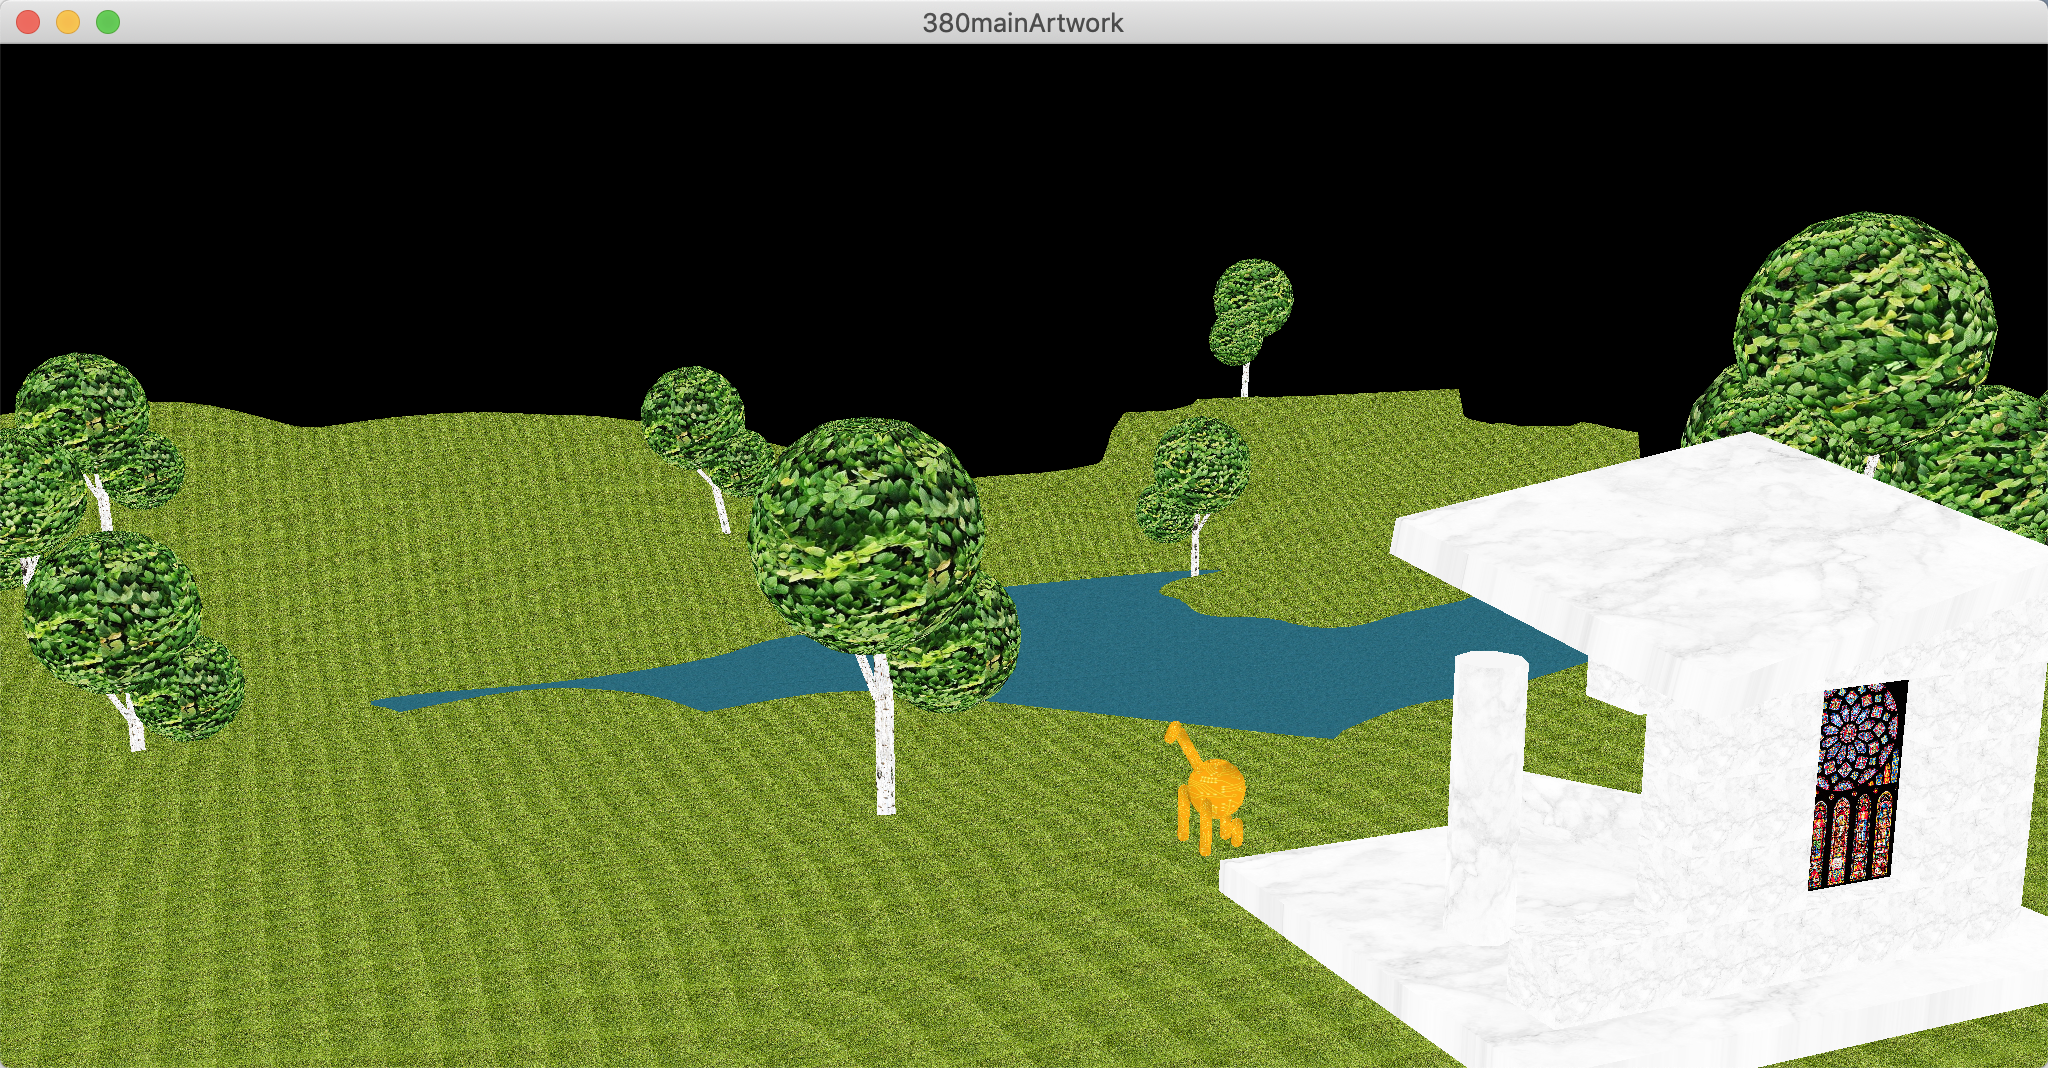
380mainArtwork.c: Study. Explore the keyboard controls. If your textures are behaving strangely or your trees are coming unglued, then go back and fix 370node.c. If it's running much slower than 60 frames per second, then talk to me. Here's a screenshot:
Clean up and hand in 370node.c and 370mainScene.c.
These are the artistic examples that I showed in class today, in case you want to revisit them. I'm not going to test you on them. I just want you to be aware of the wide variety of lighting effects, both realistic and non-realistic, that a user of our software might want to achieve.
The Milkmaid (Jan Vermeer, 1658)
An Experiment on a Bird in the Air Pump (Joseph Wright of Darby, 1768)
Bal du moulin de la Galette (Pierre-August Renoir, 1876)
Various (Edgar Degas, 1870s)
The Third Man (directed by Carol Reed, 1947)
Today we start to implement the Phong lighting model, which consists of Lambertian diffuse reflection, ambient light, and Phong specular reflection. For anyone reading this assignment outside the context of our class (for example, Josh 1.99 years from now), we are focusing on the case of a directional light and a perspective camera.
First, please take a moment to fill out a midterm course evaluation. You can find it on our course Moodle site, in the section for this week's recordings. Your responses are anonymous. Your candid feedback can improve the course in this term and future terms. Thanks!
First we implement Lambertian diffuse reflection. As usual, I try to break this task into testable baby steps.
390mainDiffuse.c: Start with a copy of 380mainArtwork.c. Inside the fragment shader's main, declare variables for dnormal, clight and dlight, setting them to simple, fake values that you can test, such as dlight = (0, 0, 1). Implement diffuse reflection. Test, using several combinations of values, until you are convinced that your code is right.
390artwork.c: In a copy of 380artwork.c, enlarge the mesh initialization code so that all three sets of attributes — XYZ, ST, and NOP — are connected to shader program locations.
390mainDiffuse.c: In the vertex shader, incorporate the new NOP attribute. Transform this normal vector to world coordinates, and pass the transformed vec3 to the fragment shader as a varying vector. In the fragment shader, receive the varying, normalize it to have length 1, and make it your dnormal. Update your shader program initialization to account for the new attribute. Test. You should now have convincing diffuse reflection.
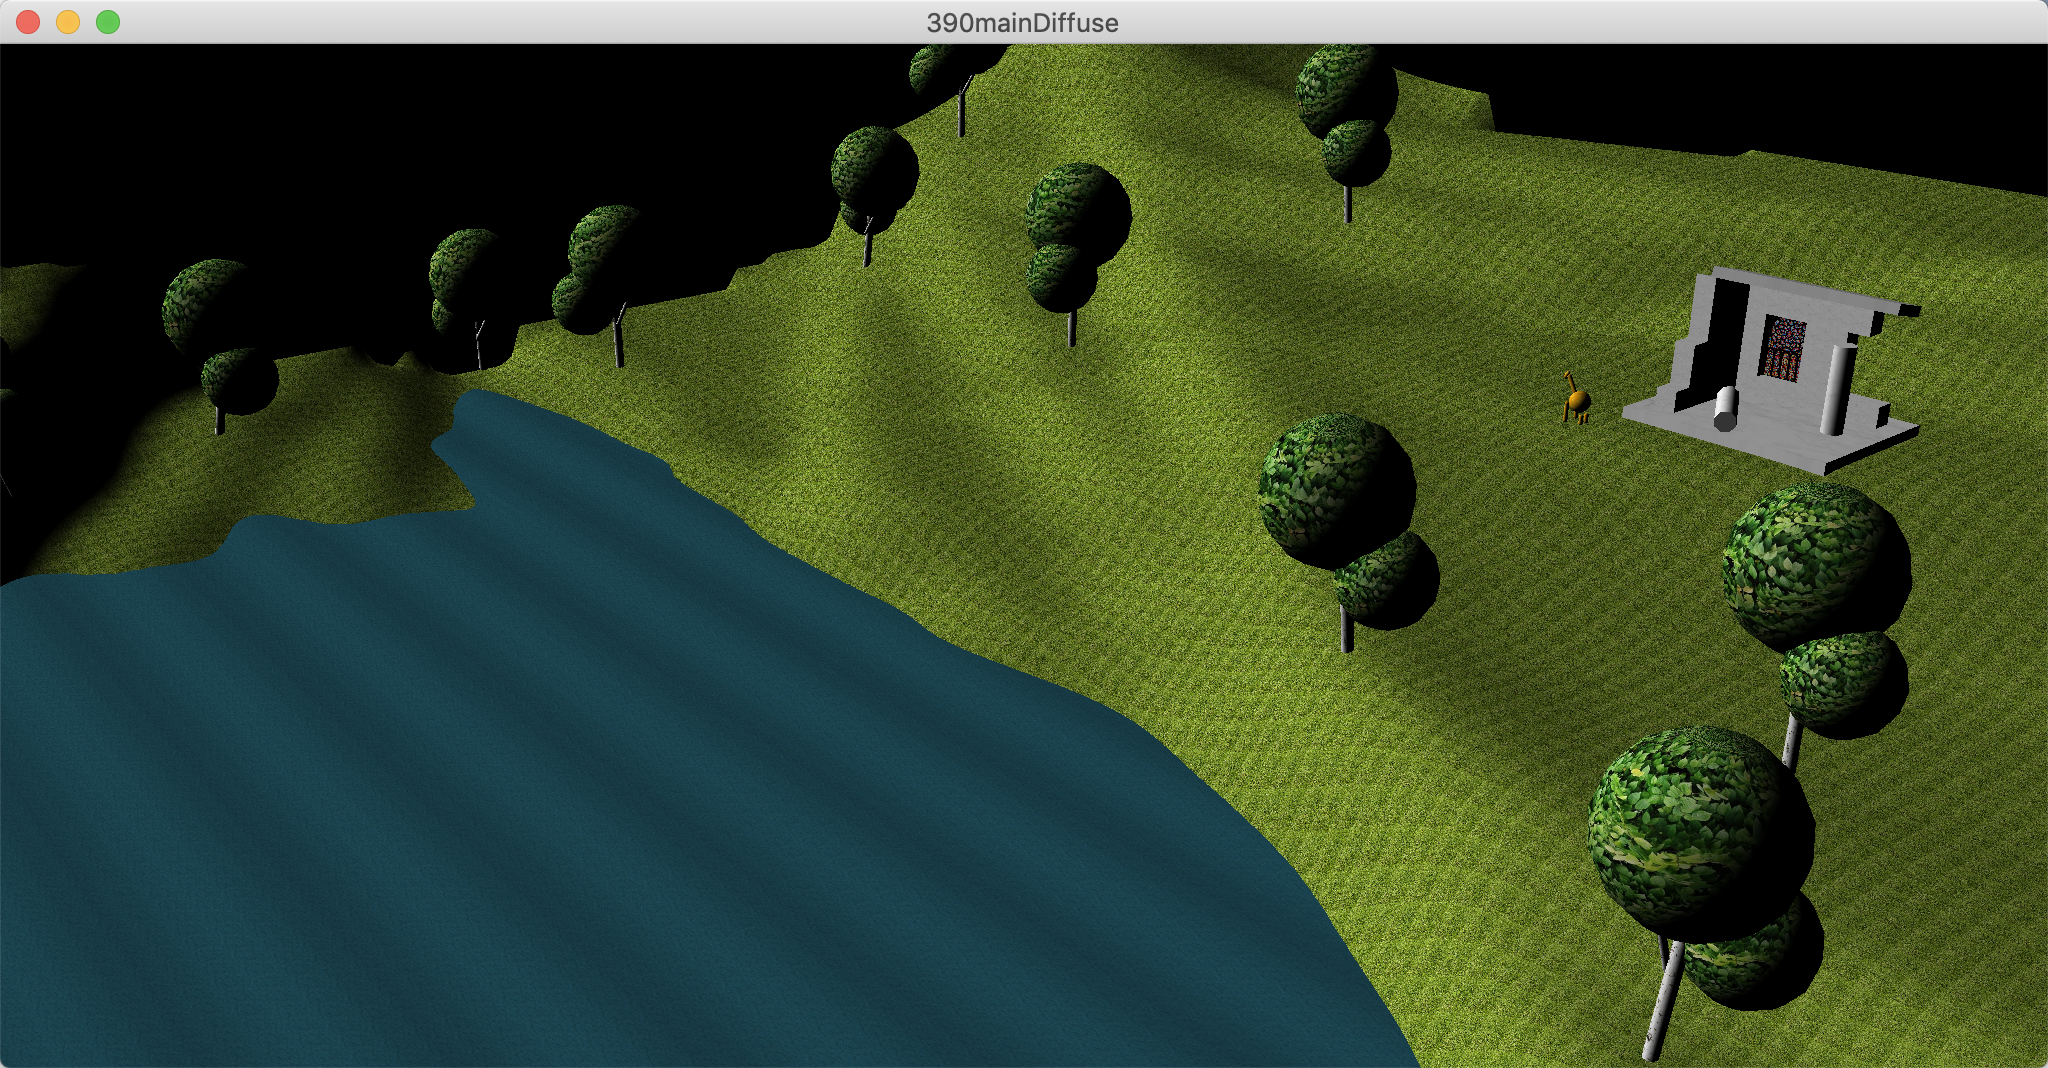
390mainDiffuse.c: In the fragment shader, move the variables for clight and dlight above main, and make them uniform. Update your shader program initialization to account for these new uniforms. In your render function, use shaUniform3 to load data into the uniforms. Test. Here's a screenshot:
Let's incorporate some ambient light. We could engineer this feature heavily, for example by giving each node an auxiliary RGB color and setting its value based on detailed information about the scene around that node. But ambient light is really a hack, so let's treat it as such, making the smallest edits necessary to achieve a reasonable effect.
400mainAmbient.c: In a copy of 390mainDiffuse.c, edit the fragment shader (and nothing else) to incorporate ambient light. It's fine with me if you simply make it proportional to clight, but use your judgment.
Clean up and hand in 390mainDiffuse.c, 400mainAmbient.c, and their dependencies.
To slow the pace of the work down a bit, today we implement a single medium-size feature: Phong specular reflection. As usual we proceed in baby steps.
410mainSpecular.c: In a copy of 400mainAmbient.c, edit the fragment shader's main to declare variables for pfrag, pcam, cspec, and shininess. Initialize them to values that are fake but reasonable, such as cspec = (1, 1, 1) and pfrag in the middle of your scene. Test. The program should behave exactly as it did earlier, because you're not using these data yet.
410mainSpecular.c: Edit the fragment shader to implement specular reflection using the fake data. Test. You might not see a specular effect. Even if you do, it might look bad, because the data are fake.
410mainSpecular.c: Edit the vertex shader to compute pfrag and output it as a varying. In the fragment shader, receive the varying and use it instead of your fake pfrag. Test. The effect should be noticeable now.
410mainSpecular.c: In the fragment shader, move pcamera above main and make it uniform. Update your shader program initialization to account for this new uniform. In your render function, load the camera's actual world position into the uniform. Test. The effect should look better.
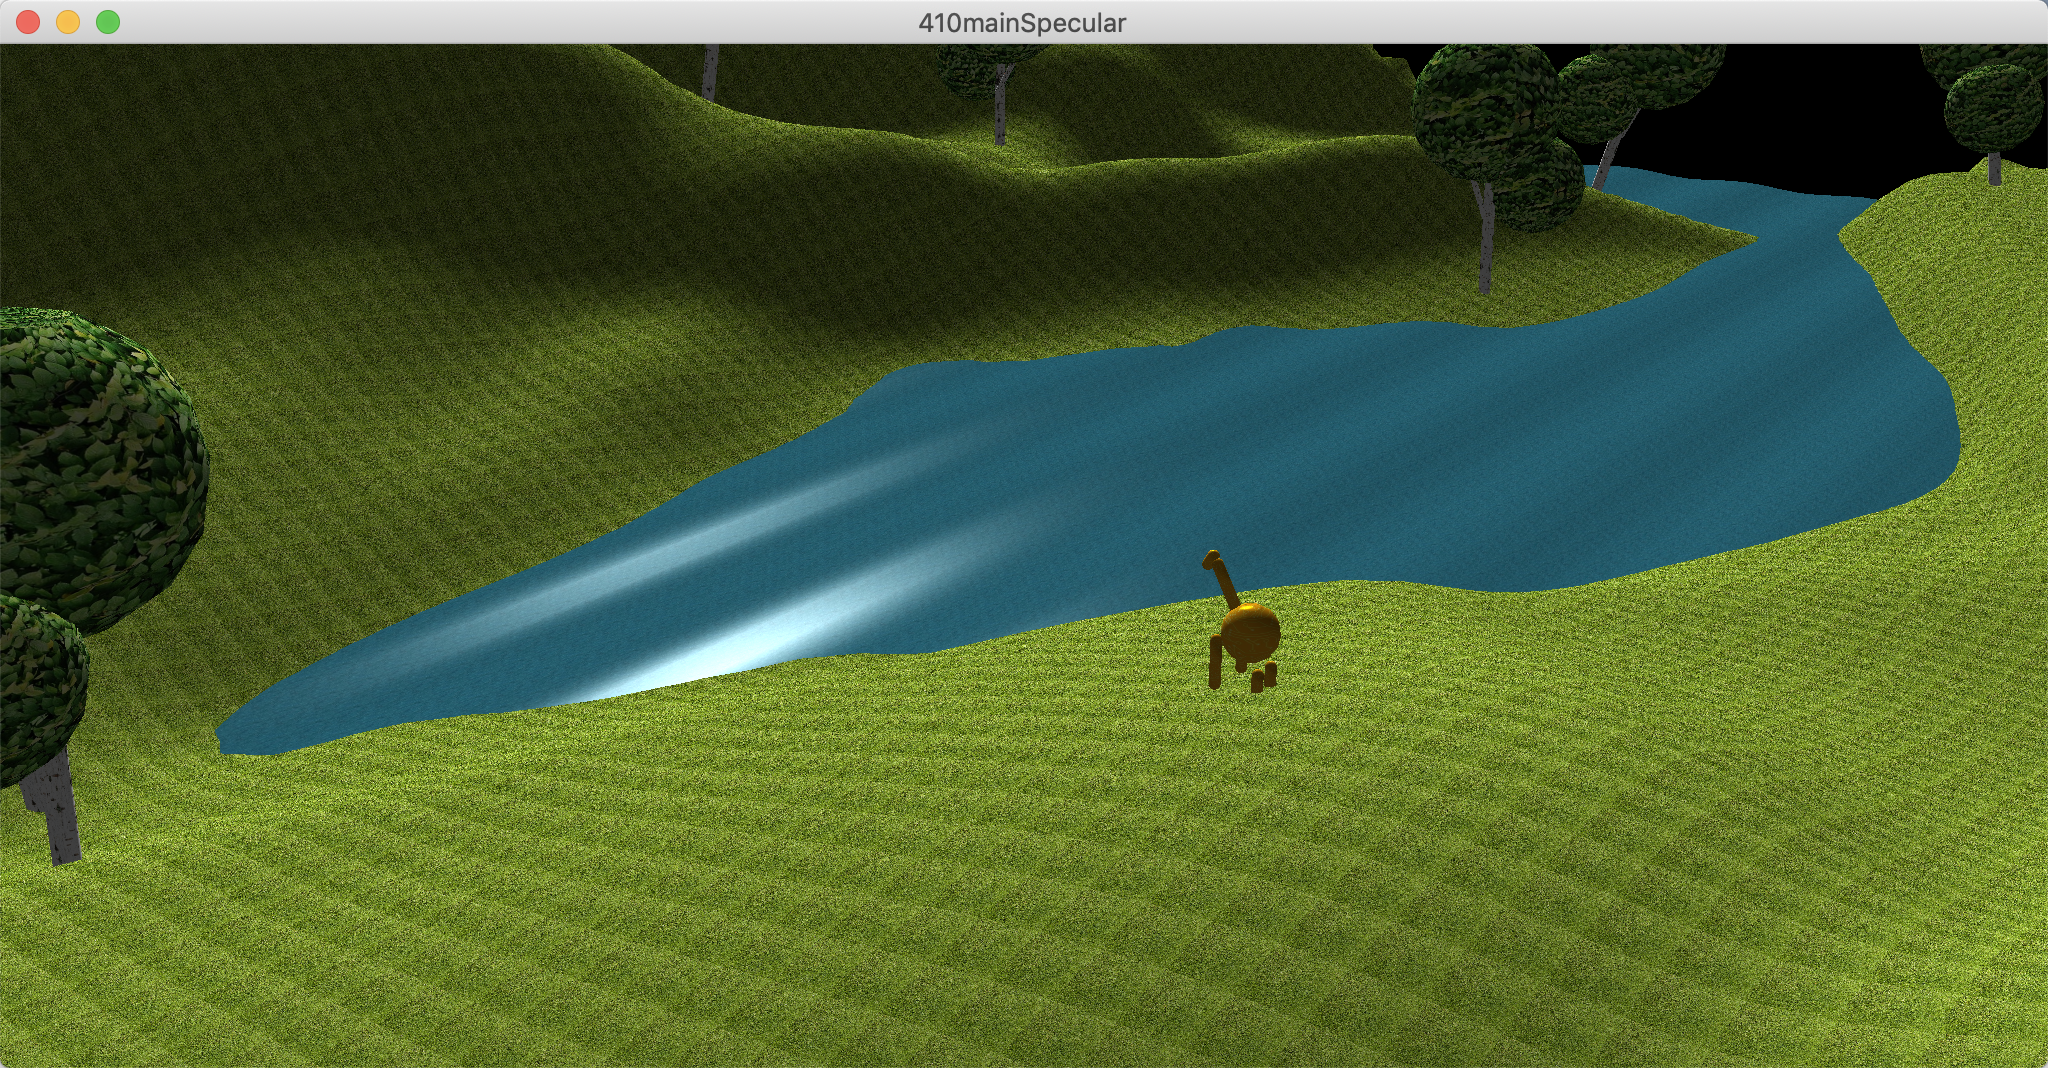
410artwork.c: To each scene graph node, add a single auxiliary 4D vector to hold cspec and shininess. Initialize these vectors so that some objects in your scene are shiny and some are dull. (Maybe some objects are satin — that is, between shiny and dull? Maybe the robot giraffe baby is golden — that is, shiny in a yellow way?)
410mainSpecular.c: In the fragment shader, replace the fake cspec and shininess with the uniform vec4 coming from the node. Update your shader program initialization and your render function to account for this new uniform. Test. Here's a screenshot:
Clean up and hand in 410mainSpecular.c and its dependencies.
Today we implement a textured light effect. We code specifically for one example (a single rectangle of stained glass). We do not try to engineer a general system that could handle arbitrarily complicated arrangements of translucent objects.
420mainTextured.c: In a copy of 410mainSpecular.c, edit the fragment shader's main to declare variables for a and n (3D vectors) and (AT A)-1 AT (a 4x4 matrix), setting them to fake values. For now, assume that the stained glass texture is whatever texture is already available to your fragment shader. Implement the textured light algorithm discussed in class. Test. Your code should compile, and OpenGL should raise no errors. If there is a visual effect, it should look pretty bad.
420artwork.c: Make global variables for a, n, and (AT A)-1 AT. Somewhere in placeTemple, set their values based on the world coordinates of the stained glass window. (Recall from class that only the 2 x 3 upper-left submatrix of (AT A)-1 AT is meaningful. Set the other 10 entries to 0.)
420mainTextured.c: In your fragment shader, raise the variables for a, n, and (AT A)-1 AT above main and make them uniform. Edit your shader program initialization to account for these new uniforms. In your render function, set their values based on the global variables in 420artwork.c. Test. There should be a different bad visual effect. The effect should be correct in one way: Only pixels behind the window (from the point of view of the light) should be lit. You might want to run a few tests, varying dlight, to verify this behavior.
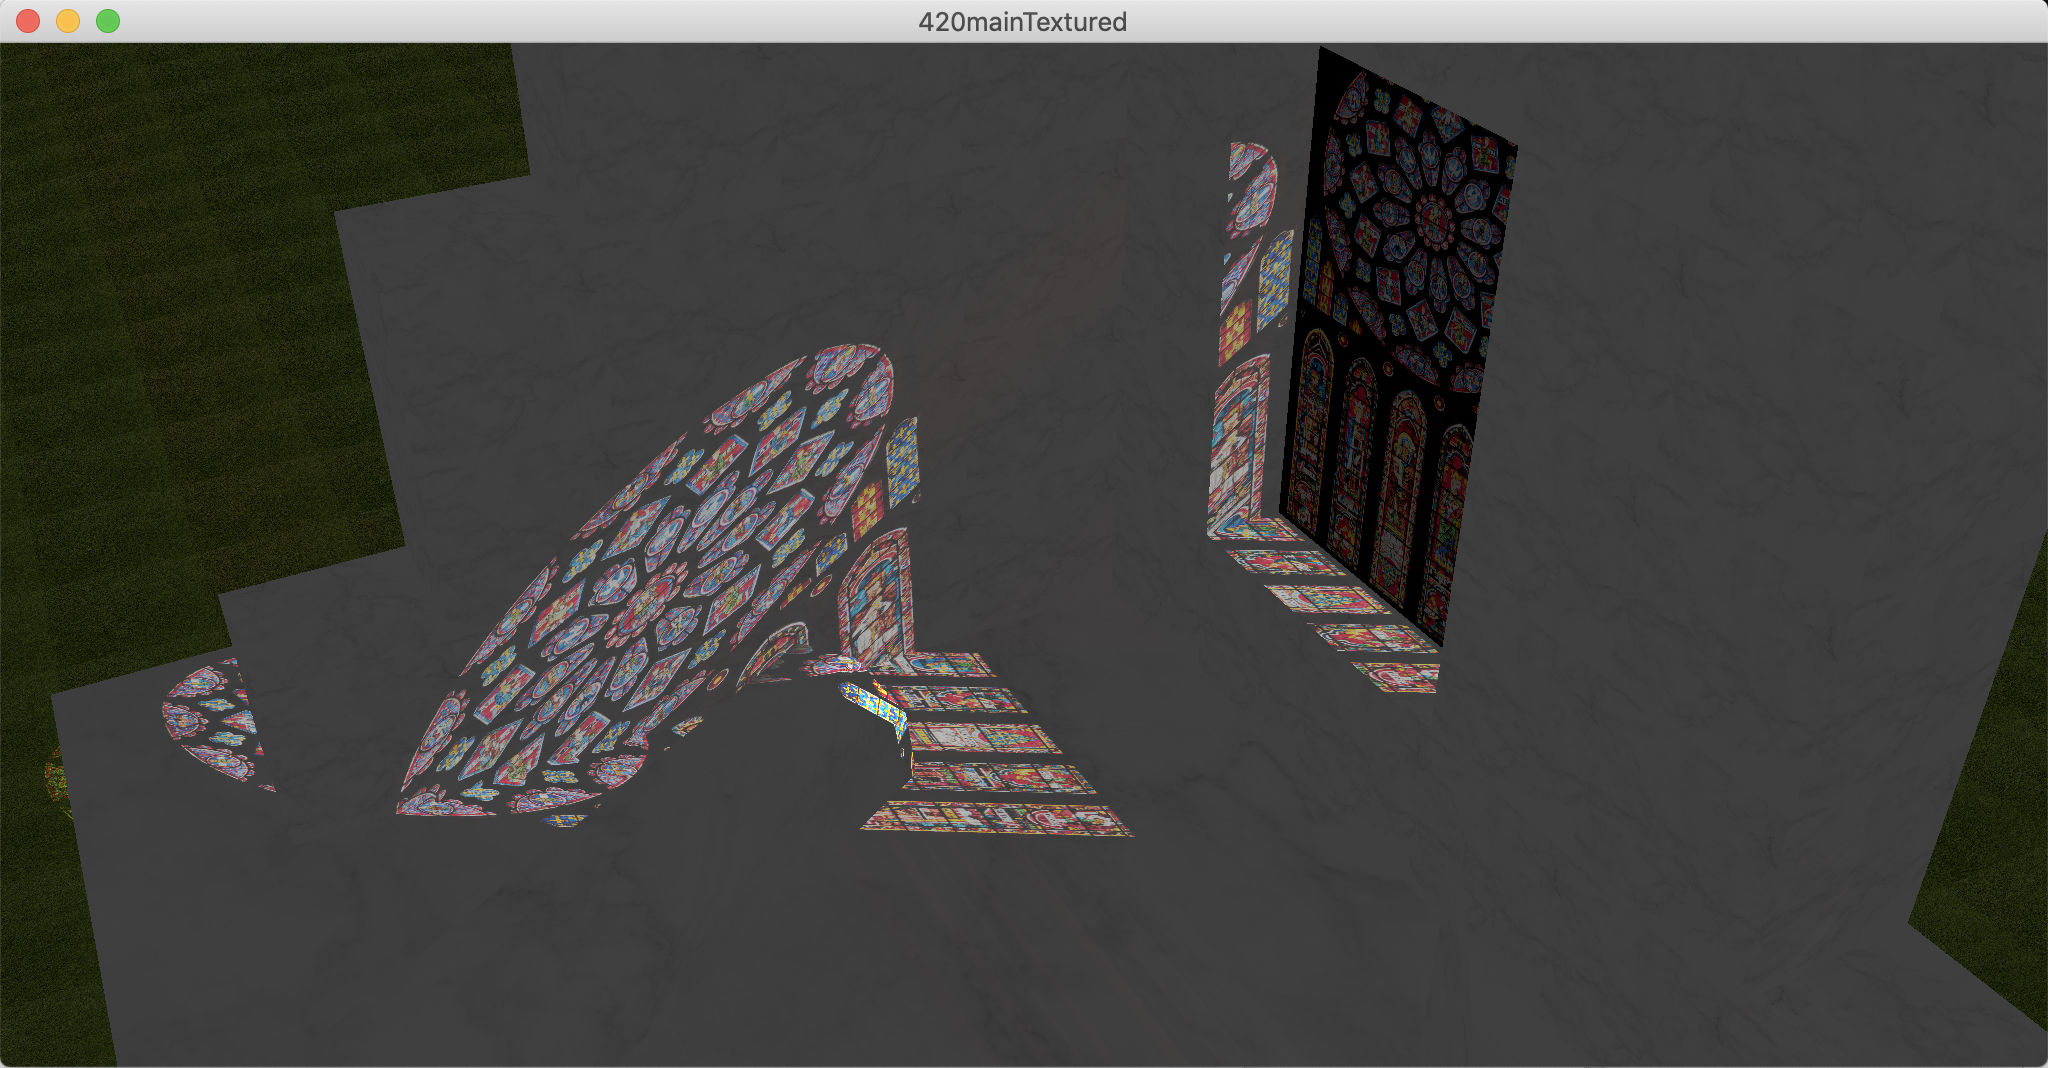
420mainTextured.c: In the fragment shader, add a second texture uniform. Update your shader program initialization code. In the render function, use texRender and texUnrender to pass the stained-glass-window texture into the second texture uniform, activating it on a texture unit that's not being used by nodeRender. See below for a screenshot. (It is correct for most of your scene to be dark, with only a tiny part of the scene being lit by the light passing through the stained glass. We fix that in a later assignment.)
Clean up and hand in 420mainTextured.c and its dependencies.
Today we implement shadow mapping. I have streamlined the treatment from previous years of this course. Still, getting shadow mapping to work in OpenGL is not easy, and everything's harder during the COVID-19 pandemic. Therefore this assignment is optional. However, I expect all students to understand the concepts of shadow mapping in detail. In other words, you are expected to be able to explain every aspect of shadow mapping on paper, even if you can't make OpenGL do it.
A directional light is actually an orthographic camera in disguise. (And a positional light is actually one or more perspective cameras in disguise, but we're not handling that case today).
430mainShadow.c: Start with a copy of 420mainTextured.c (or whatever your most recent complete lighting assignment is). In the section of your code where you initialize your lights and camera, add a second camera. Make it orthographic. Set its projection parameters to something like left = -200, right = 200, bottom = -200, top = 200, near = -10, far = -200. (The idea is to make its viewing volume big enough to enclose the scene. The number 200 is based on a LANDSIZE of 128.) Use camLookAt to look at some part of your scene from a distance of 100 or so. Test. Your program should behave as it did earlier, because you are not yet using this camera.
430mainShadow.c: If you have a global variable for dlight, then move it into render (or whatever you call your rendering function). In render, set dlight to be the vector pointing out of the back of the camera (as always, in world coordinates). You can compute this vector using the camera's isometry and what? And then load it into its GLSL uniform as always. Test. Your scene should look the same as it did earlier, except that the light might be coming from a different direction.
430mainShadow.c: For debugging purposes, it is helpful to have lots of light in our scene, even if it makes the scene temporarily unrealistic or ugly. If for some reason your clight is dim, then make it white. If you have implemented textured light, then add full white (1, 1, 1) to your sampled glass color. Test. Most or all of your scene should be bright. The area lit by the stained glass should be overly bright.
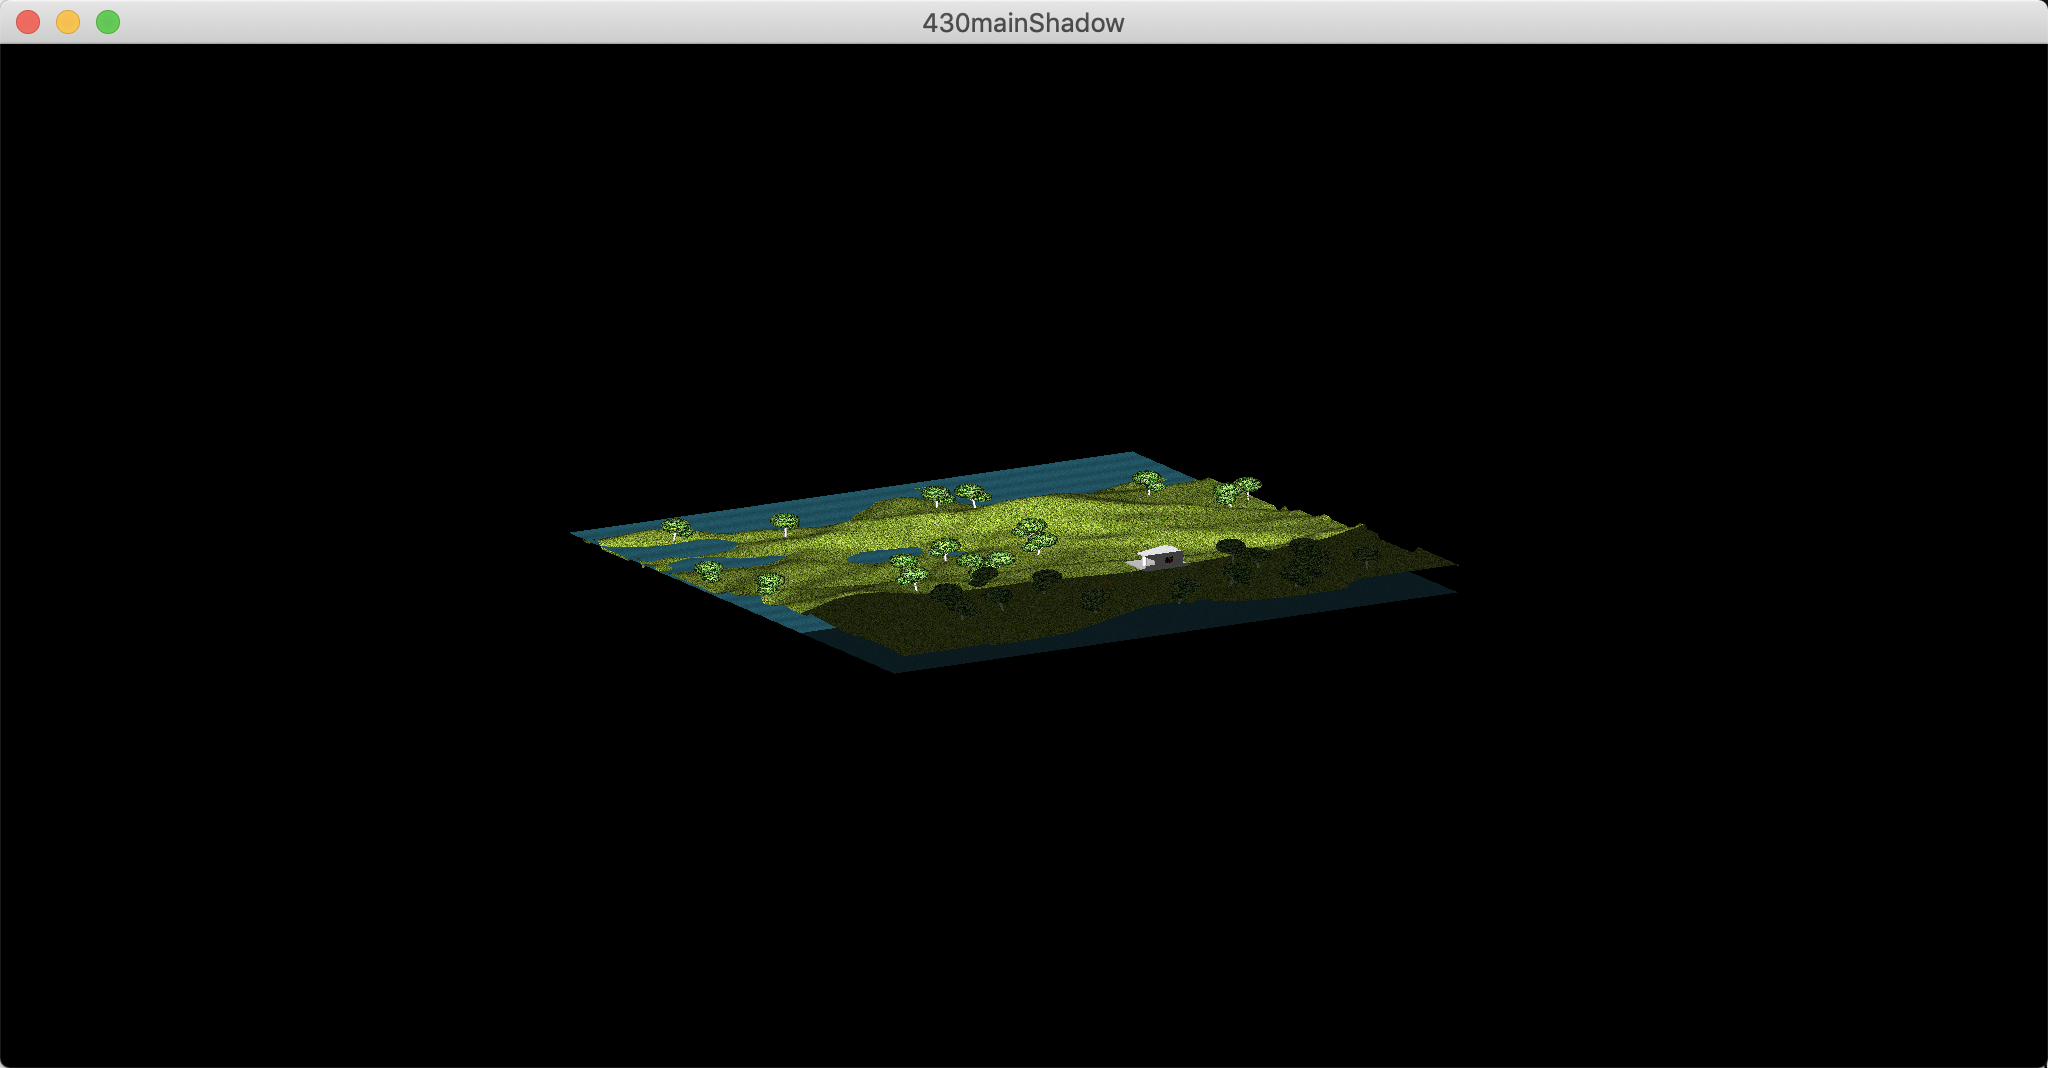
430mainShadow.c: Make two new copies of render, called something like renderUsually and renderUnusually. Edit renderUnusually to use the camera corresponding to your light, instead of your usual camera. Edit render to simply call renderUnusually. Test. Your program should render the scene from the light's point of view. The image might be distorted (why?). See my screenshot below. (For debugging purposes, it might be helpful if you temporarily added a keyboard control to let you toggle whether render calls renderUsually or renderUnusually.)
Now we set up the shadow map and render into it. Then are we almost done? No.
440shadow.c: Skim. This file defines a shadow map data type. It comprises two OpenGL resources, which live entirely in the GPU/VRAM. The first resource is an off-screen framebuffer with depth channel but no RGB channels. The second resource is a texture with one channel for depth. These two resources are linked together, so that, after we render into the framebuffer, we can extract results by sampling from the texture.
440mainShadow.c: Start with a copy of 430mainShadow.c. Include 440shadow.c. In the appropriate places (wherever you configure your lights and camera), declare, initialize, and destroy a shadow map. Test. Your program should produce the same effect as it did earlier, because you are not yet using the shadow map.
440mainShadow.c: Edit renderUnusually so that it clears only the depth buffer — not the color buffer. Edit render so that it calls shadowRenderFirstPass, then renderUnusually, then shadowUnrenderFirstPass, then renderUsually. Test. Your program should produce the same output as it did earlier, from the point of view of your usual camera. (However, behind the scenes your shadow map is correctly set up in the GPU/VRAM. We hope.)
The two rendering passes should really use two different shader programs. But adding a second shader program is a big hassle, because it requires us to add a second VAO to each meshGLMesh (why?). So we employ a tawdry workaround, that should be beneath our dignity: combining two shader programs into one, and selecting which one we want at run time using a uniform.
450mainShadow.c: Start with a copy of 440mainShadow.c. Edit the vertex shader. Add a uniform; it might as well be a 4D vector. In the main function, start with an if-else statement, which chooses which way to go based on whether the new uniform is positive or negative (or some other criterion). In both branches of the if-else, do the same computation that you used to do. So the branches are identical; we'll make them different later. Make the same alterations to the fragment shader, using the same uniform. Update your shader program initialization to account for the new uniform. In renderUsually and renderUnusually, set the value of this new uniform differently, so that your GLSL code can tell the difference. Test. Your program should produce the same output as it did earlier.
450mainShadow.c: Edit the first-pass versions of the vertex and fragment shaders to be really simple. The vertex shader performs the modeling and viewing transformations to write the all-important gl_Position, and does nothing else. The fragment shader outputs a constant RGB color (with a 1 tagged onto the end), and does nothing else. Test. Your program should produce the same output.
450mainShadow.c: Edit your second-pass fragment shader in two ways. First, insert the GLSL code below in the appropriate places. Second, scale your diffuse and ambient reflections by the resulting shadow. Edit your shader program initialization to account for the new uniform. In render, wrap the call to renderUsually in calls to shadowRenderSecondPass and shadowUnrenderSecondPass, activating the shadow texture on a texture unit that's not being used elsewhere. Test. The resulting image depends on some details of your scene. Probably either shadow is 0, in which case all of your diffuse and ambient is turned off, or shadow is 1, in which case the shadow map appears to have no effect. Both are okay at this point.
uniform sampler2DShadow textureShadow;
vec4 pFragShadow = vec4(0.5, 0.5, 0.5, 1.0);
float shadow = textureProj(textureShadow, pFragShadow);
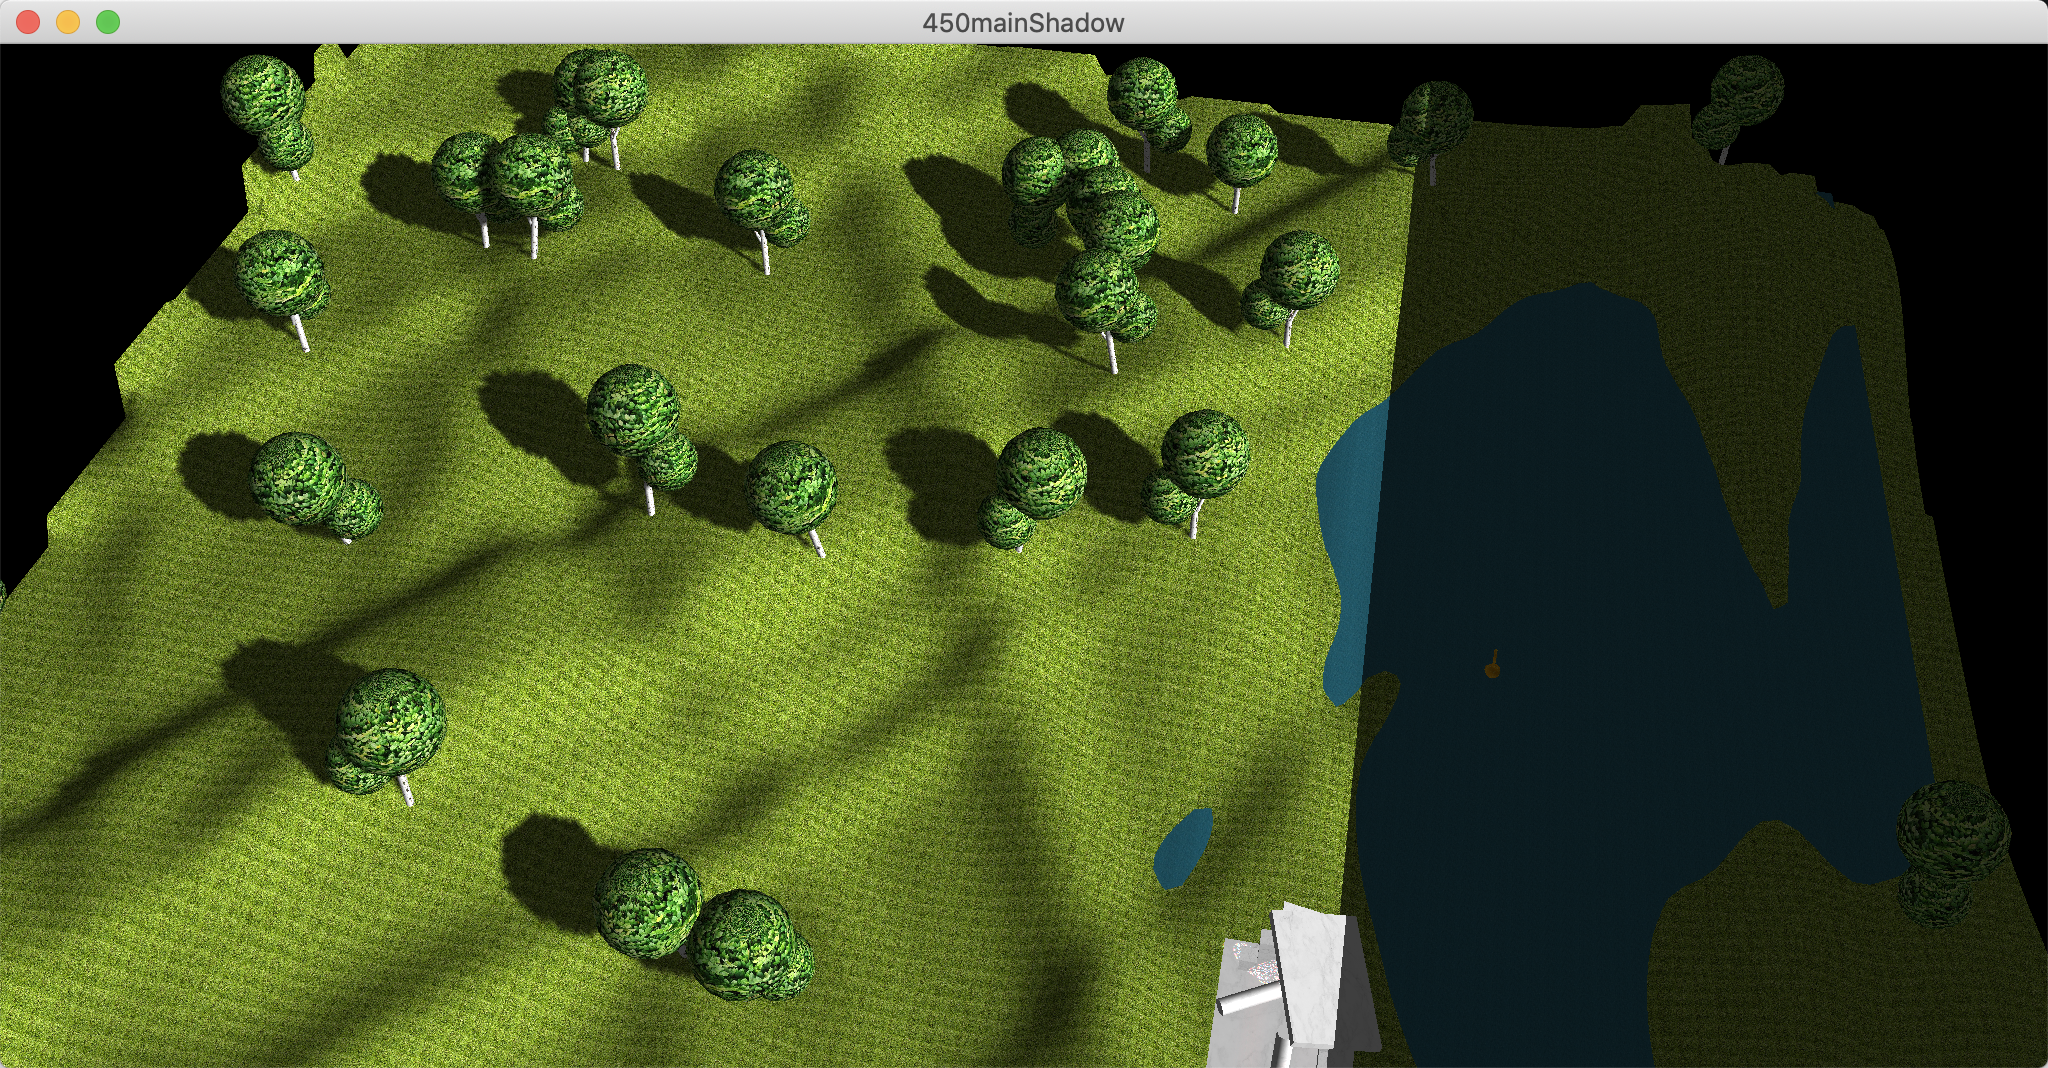
450mainShadow.c: In the preceding iteration, shadow was 0 or 1 over the whole scene because pFragShadow was constant. So let's fix that. Edit the second-pass fragment shader to make pFragShadow a varying. Edit the second-pass vertex shader, mimicking the code below, to set that varying. (In GLSL, matrices are specified column-by-column, so the shadow viewport matrix is actually the transpose of what it looks like in the code.) Update your shader program initialization to account for the new uniform. Edit renderUsually to load the light camera's P C-1 into that uniform. Test. You should now have some shadows. See my screenshot below.
uniform mat4 viewingShadow;
out vec4 pFragShadow;
mat4 viewportShadow = mat4(
    0.5, 0.0, 0.0, 0.0,
    0.0, 0.5, 0.0, 0.0,
    0.0, 0.0, 0.5, 0.0,
    0.5, 0.5, 0.5, 1.0);
pFragShadow = viewportShadow * viewingShadow * modeling * vec4(xyz, 1.0);
There are two problems to fix. First, we need to undo the artificially bright lighting that we introduced in 430mainShadow.c. Second, the stained glass window is casting a shadow over its own textured light.
460mainShadow.c: In a copy of 450mainShadow.c, undo whatever you did to make the light overly bright. Test. It's possible that your scene has no more light in it (other than ambient). Or it's possible that some of the textured light is coming through, because your shadow map is coarse.
460mainShadow.c: In renderUnusually, temporarily disconnect the stained glass window from the scene graph, then render the scene graph, then reconnect. Test. Here's my final screenshot:

There are still two big tasks. You might think about how you would accomplish them. I won't write out detailed instructions.
First, most of the scene is dark. We need to add another light, controlled by the same light camera, to bathe the scene in light. It should have its own shadow map, with every object in the scene casting shadows, including the stained glass window. So we need to add a second shadow map and a third rendering pass.
Second, our shadow maps are coarser than they need to be, because our light camera viewing volume is larger than it needs to be. Ideally, the light camera viewing volume should be just large enough to contain the part of the scene that is both viewable by the camera and lit by the light. For the textured light, the viewing volume could be quite small. For the other light, the viewing volume would be larger, but still not as large as we have it. So we should have two separate light cameras, and we should rig their viewing volumes using delicate geometric calculations.